I’m still running on Ubuntu 22.04 and it’s time to upgrade to something more recent after the release of Ubuntu 26.04 earlier this year. I’ve decided to start with a clean installation and make a number of improvements to my setup. So far, I’m using an ext4 system partition and a separate ext4 LUKS encrypted partition for the home directory. The benefit of this is that I can use Clonezilla to quickly back-up or copy the relatively small boot and system partitions and restore them on another SSD. This gives me a working system in a few minutes that is configured exactly as I want it, and I can then restore the home partition that holds more than 1.5 TB of data at my leisure. The problem: The system partition is not encrypted, which I have compensated so far by using the SSD hardware encryption with a password on power-on. This works for me, but an encrypted system partition would be even better. The challenge: The Ubuntu desktop installer does not have an option to create a system with separate system and home partitions and encrypt them both. A pity. But with the experience gained by experimenting with installing, backing-up and restoring physical SSDs to virtual machines and vice versa over the past years, I have found an elegant solution:
The General Idea: First Virtual, then Physical
The solution is actually quite simple: Create a virtual 60 GB disk and install Ubuntu 26.04 in the virtual machine with the combined system/home directory on a single partition. Then, create a Clonezilla backup of this installation and restore it on a much larger physical disk. This leaves most of the space of the physical disk unused which can then be used for another encrypted partition to which the home directories can then be moved to.
The EFI way!
An important point at this step: By default, Virtualbox uses an old fashioned BIOS and Master Boot Record for a VM. That works well in the VM world but not so much when the disk image that runs in the VM is later exported to a physical drive and a notebook that would rather like to use EFI to boot. So the way to go here is to create the virtual machine and tick the ‘EFI’ box in the settings before installing Ubuntu 26.04 into it.
Clonezilla is Your Friend
Once the VM is configured for first use, the next step is to install Ubuntu with a combined encrypted system / home partition option into the VM and then to reboot the virtual system for further GUI configuration. Once things look good, the system can then be shut down. The next step is to configure the VM to boot a Clonezilla .iso image from the virtual CD drive. The Virtualbox EFI does not seem to have an easy way to select the drive to boot from, it always boots from the main system drive. To get Clonezilla running, it is necessary to untick the ‘EFI’ support box again in the VM’s settings and set the CD-ROM drive as first boot device. Clonezilla then boots as expected and it is then possible to back-up the 60 GB disk. The backup target can, for example, be an SD card or disk drive attached to the physical computer via USB and then mapped into the VM as a USB device. To do this, USB-3 support must be activated in the VM settings.
Backup of the Encrypted Partition
When the backup task is started, Clonezilla asks if it should unlock the encrypted partition with the password or if it should back up the complete partition in its encrypted state. It is important at this point not to use the password, but to let it back-up the encrypted partition. There was a time when backing up a 60 GB drive took quite some time, but fortunately this is no longer the case. After a few minutes, the complete installation is on the backup drive and we can now move on to the physical world.
Restore on a Physical Computer
The next step is to use Clonezilla again to restore the backup on a large physical drive in a physical computer. Before restoring, Clonezilla asks if the partitions should be expanded to use the complete capacity of the drive, or if the partition sizes should remain as they are. With the ‘leave as is’ option, the 60 GB system partition and the small EFI boot partitions are restored in their original state and most of the physical drive remains empty.
Create an Encrypted Home Partition
Once the restore is complete, Ubuntu will boot on the physical machine. So far so good, but /home is still on the system partition. The next step is therefore to use the GUI ‘disk’ utility to create an encrypted ext4 partition in the empty space of the drive.
Let’s Have Another User
At this point it is a good idea to create another user with admin rights in the GUI settings that we will use later on. The idea behind it: In the next step, we copy the home directories while the system is running, so some open files of the currently active user might not make it in a sane state to the new partition. By throwing away the user account from which the copy command has been issued and using the new user account after the next reboot avoids any potential issues. After creating the new user account, log out of the current user account, check that the new user is working and then return to the original user.
Let’s Copy
Next, the new partition can be mounted with the GUI file manager and once done, the /home directory can be copied to the new partition as follows:
sudo rsync -avxHAX /home/ /mnt/abcdefIt’s important that the ‘new’ home on the new partition does NOT live in /home, all user directories must be at the root of that partition!
To make use of the copied home directories, add one line in /etc/crypttab and one line in /etc/fstab, so the partition is automatically unlocked and mounted to /home during reboot:
# Get the UUID of luks data partition
#
# IMPORTANT: CLOSE the LUKS PARTITION first,
# so there is no mix up of the UUIDs and which one
# to use.
#
blkid

# Add to crypttab
#
home_crypt UUID=017aaad7-5120-4126-a07c-9887fab88b88 none luks

# Prepare fstab for auto-mount:
#
/dev/mapper/home_crypt /home ext4 defaults 0 2
Once done, reboot. If the password of the system and home partitions are the same, Ubuntu will only ask once for a password during the boot process. How convenient! If they are different, a second password screen will come up. If the system doesn’t boot anymore, there’s likely a typo somewhere in those two lines inserted into the config files, or the UUID is wrong. In this case, boot into recovery, verify, fix and reboot.
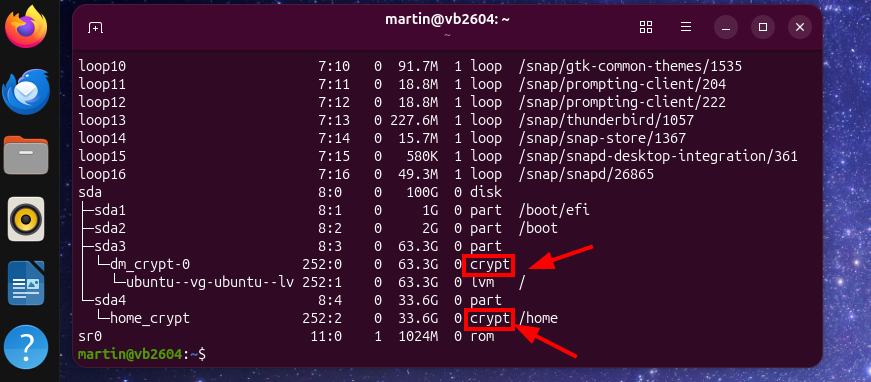
Check that /home is on the New Partition
After login, you can verify if the new partition is used for /home as follows:
$ lsblk

sda                           8:0    0   100G  0 disk
├─sda1                        8:1    0     1G  0 part  /boot/efi
├─sda2                        8:2    0     2G  0 part  /boot
├─sda3                        8:3    0  63.3G  0 part
│ └─dm_crypt-0              252:0    0  63.3G  0 crypt
│   └─ubuntu--vg-ubuntu--lv 252:1    0  63.3G  0 lvm   /
└─sda4                        8:4    0  33.6G  0 part
  └─home_crypt              252:2    0  33.6G  0 crypt /home
Final Step: Throw away the user from which the copy command has been executed.
And there you go, here is your system with separately encrypted system and home partitions!