In 2020, the Vintage Computing Festival had to happen online. For this, we used quite a number of virtual machines in the cloud (i.e. in a datacenter) to host the BBB video conference servers. The live streams of the talks, however, ran on a physical notebook and we used OBS Studio to record the screen of that notebook and stream it to to the CCC distribution network. And it looks like we are going to have at least a part of this year’s event in the cloud again. So it was time to think a bit about how to improve last year’s setup. Pretty high on my list: Virtualize that notebook with OBS on it and push it out into a virtual machine in the cloud.
The Problem Space
While running OBS on a physical notebook worked great, I felt that there are two areas in which we could improve this year: Running a BBB client in the browser with video streams, and OBS for recording and streaming at the same time takes quite some processing power. And even though the notebook was relatively new, the mobile Core i5 processor could not run BBB in the browser with OBS recording at full-HD resolution and streaming at the same time. So we settled for streaming at 1920x1080p and recording at 1280x720p. For the final publication of the video, the material was upscaled to 1080p again. Not ideal. And the second thing I didn’t like was that the notebook was physically located at my place. That meant that I had to run the streaming on my own for two days and became I and my Internet connectivity became the single point of failure.
OBS out in the Cloud
The fix for both problems is to put OBS for recording and streaming the screen into a virtual machine in a data center. That’s not quite the typical use of a VM in the cloud but I have found quite a number of good uses for it over the past year. Unfortunately, OBS is not on good terms with the x virtual frame buffer (xvfb) package that is the basis of my ‘GUI in the cloud’ solution. I also tried to get it working with other solutions such as X2Go but that also didn’t work. A bit of research on the Internet also didn’t get me anywhere. The problem as I understand it is that OBS requires OpenGL Mesa support of the X-server which xvfb and X2Go do not seem to provide.
But then I noticed that there is yet another approach to running a Linux X-Server and window system in a virtual machine: By simulating a graphics card and screen instead of ‘just’ a virtual frame buffer. Linux ships with a number of graphics card drivers, such as for example for Intel, Nvidia or AMD graphics chips. And on top, it comes with an X-server graphics driver called “xserver-xorg-video-dummy”. And this X-server and driver combination combines OpenGL Mesa support in software. Ah! And with this approach I could get OBS running in the cloud in a virtual machine without a real graphics card.
While OBS would take great videos of non-video content like scrolling through web pages, recording of video content did not look quite right. It’s hard to explain. After a good night’s sleep, however, I had the idea to see if I could get the refresh rate of the simulated screen that is attached to the simulated graphics card to exactly 60 Hz, so OBS could record at 30 Hz exactly. And that was the final piece of the puzzle Once that simulated monitor ran at a refresh rate 60 Hz, OBS suddenly produced sharp and crisp recordings of video content, e.g. of BBB sessions.
VM Setup
O.k., long story short, here’s how the VM has to be set-up to make this work. In my case, I got a VM at Hetzner for the purpose. I scaled it up and down a bit to see how many vCPUs I need, and came up with 8 vCPUs for 1920x1080p streaming and recording with BBB running in a browser. Yes, that’s not a small VM, but at around €35 a month or around €1 a day, quite affordable.
One strange thing: The setup described below will only work with their Intel based VMs, while the X-server stubbornly refuses to work in their AMD based VMs. I made the same experience with my other VNC based cloud GUI solutions. If you have any idea why, please leave a comment.
And here is the sequence of package installs in the VM that brings the system to life. First, the repository is updated, the video dummy driver and X-server system is installed, and a new user is created to be used in the GUI as follows:
apt update
apt-get install xserver-xorg-video-dummy

adduser cloud

# Root rights for the user
usermod -aG sudo cloud
The X-server requires a config file in /etc/X11/xorg.conf that should have the following content. The Modeline used in this config file creates a monitor that runs with a refresh rate of exactly 60 Hz. This is important for OBS to create high quality recordings of video streams!
nano /etc/X11/xorg.conf
# This xorg configuration file is meant to be used
# to start a dummy X11 server.
# For details, please see:
# https://www.xpra.org/xorg.conf

# Here we setup a Virtual Display of 1920x1080 pixels

Section "Device"
     Identifier "Configured Video Device"
     Driver "dummy"
     #VideoRam 4096000
     VideoRam 256000
     #VideoRam 16384
EndSection

Section "Monitor"
    Identifier "Configured Monitor"
    HorizSync 5.0 - 1000.0
    VertRefresh 5.0 - 200.0
    Modeline "1920x1080_60.00"  173.00  1920 2048 2248 2576  1080 1083 1088 1120 -hsync +vsync
EndSection

Section "Screen"
    Identifier "Default Screen"
    Monitor "Configured Monitor"
    Device "Configured Video Device"
    DefaultDepth 24
    SubSection "Display"
        Viewport 0 0
        Depth 24
        Virtual 1920 1080
    EndSubSection
EndSection
Next, configure and run the X-server and abort with CTRL-C once the config was written and the output stops after a second:
X -config /etc/X11/xorg.conf
Now, install the Ubuntu desktop packages for the GUI:
sudo apt install x11vnc gnome-shell ubuntu-gnome-desktop autocutsel gnome-core gnome-panel gnome-themes-standard gnome-settings-daemon metacity nautilus gnome-terminal dconf-editor gnome-tweaks yaru-theme-unity yaru-theme-gnome-shell yaru-theme-gtk yaru-theme-icon fonts-ubuntu tmux fonts-emojione
And that’s it, now reboot.
reboot
When the system comes up it takes a few seconds for the X-server to start and the Ubuntu login screen to initialize. Once ready, start the VNC server with the X token of root and use a VNC Client such as Remmina to enter the user’s password. The user id (114 in this example) might be different on your system.
Note: The first time you run x11vnc, it requires a password to be entered. It’s limited to 8 characters, all characters beyond are ignored. Not good at all from a security point of view but you can always use the -localhost parameter, so the TCP port used by x11vnc is not exposed to the world and tunnel the connection through an SSH tunnel.
sudo x11vnc -auth /run/user/114/gdm/Xauthority -usepw -forever -repeat -display :0
Now enter the password for user “cloud” that was created a the beginning of the process. The greeter will then go away but is not replaced by the desktop, as that runs as user “cloud”. Press CTRL-C to abort x11vnc and restart it with the X token of user “cloud”. Again, the user id (1000 in this example) might be different on your machine:
sudo x11vnc -auth /run/user/1000/gdm/Xauthority -usepw -forever -repeat -display :1
We are almost there now but one thing remains to be done: We need audio for OBS recording. Turns out that the PulseAudio system works well even if no physical sound card exists:
sudo apt-get install pulseaudio jackd2 alsa-utils dbus-x11
And that’s it, the desktop in the cloud is complete now and the final thing that remains to be done is to install and run OBS:
sudo apt install obs-studio
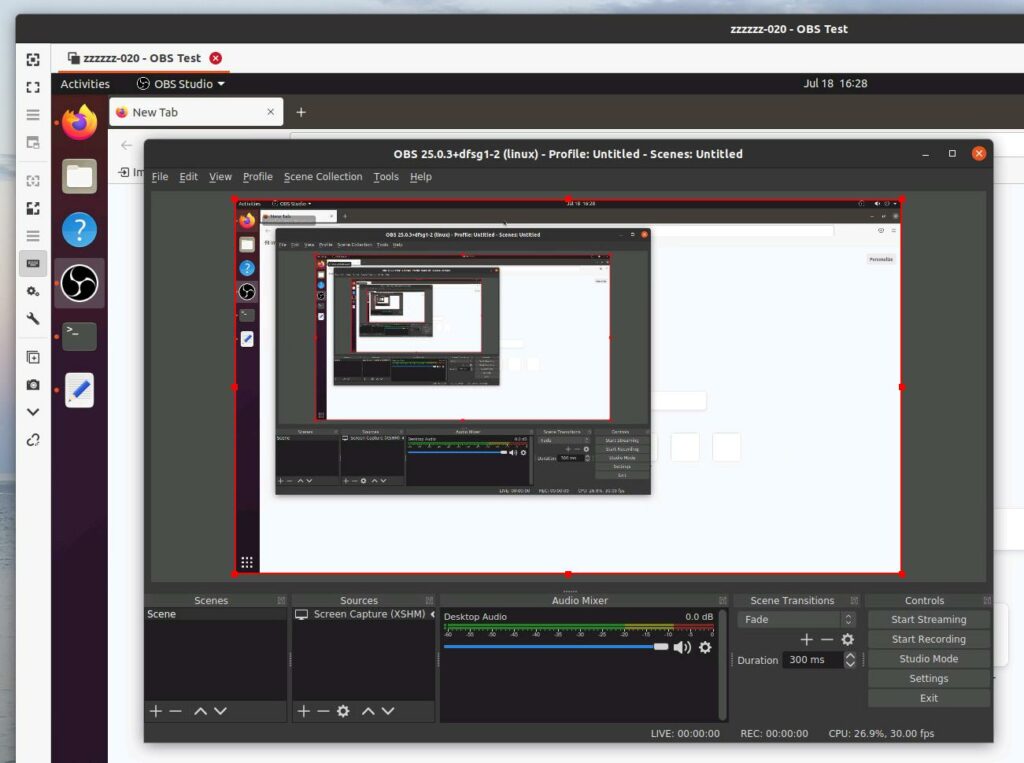
There you go, OBS studio in the cloud with 1920x1080p recording of BBB sessions.
Addendum 23.1.2023:
Some Ubuntu 20.04 system updates switch the ‘greeter’ from X11 to Wayland, while the actual session still uses X11. This breaks the x11vnc startup but can be fixed by editing the following config file and rebooting:
#Edit:
/etc/gdm3/custom.conf

# Uncomment the line below to force the login screen to use Xorg
WaylandEnable=false

# Reboot