A quick post today on a personal new backup speed record: I do have a lot of data on my notebook and thus use a 2 TB SSD, which is currently about 50% full. Also, I do like to have an emergency spare drive at hand so I can quickly get operational again should anything happen with my notebook or the drive. That means that I have a 1:1 copy of my installation at hand that I keep up-to-date by rsync’ing deltas in regular intervals. This process is usually quite fast as the deltas are relatively small. Creating a new spare SSD, however, requires copying 1 TB of existing data to the new drive, which previously took many hours. But I’ve refined my hardware and technique over time. So this time around, I got 1 TB of data to a new spare SSD in around 35 minutes. The sustained transfer speed was 490 MB/s, or 28 GB per minute between the two LUKS encrypted partitions!
So here’s my setup:
The source drive was a 2 TB Samsung 860 EVO SATA SSD in a UGreen SATA to USB 3.1 Gen 2 (10 GBit/s) adapter connected to a USB 3.1 Gen 2 port of a Lenovo L14 notebook with an 11th generation Intel i5 processor. It’s not the cheapest USD/SATA adapter but it can make full use of the maximum SATA transmission speed of 6 Gibt/s. Cheaper adapters are usually limited to the standard USB 3 transmission rate of 5 GBit/s.
The target drive in my setup was a 2 TB Samsung 970 EVO Plus NVMe SSD in the L14’s internal NVMe M.2 slot. This SSD is capable of sustained write speeds well beyond of 800 MB/s if the CPU is capable of continuously shuffling data into the drive at this rate.
Previous tests have shown that rsync and even the simple cp command are unable to deliver data to a drive at such speeds. Partclone, however, which copies (used) sectors of a partition instead of looking at files can easily do this. The slight hassle with partclone and LUKS partitions is that the target partition must be of the same size or bigger than the source partition, so one has to manually start LUKS on both source and target partitions without mounting the file system. Here’s how the whole procedure works in practice:
# List block devices available
sudo lsblk

# Open LUKS (Note: Just opens but does NOT mount!!!)
sudo cryptsetup luksOpen /dev/sdbX cryptsrc
sudo cryptsetup luksOpen /dev/nvme0n1pY cryptdst

sudo partclone.ext4 -b -s /dev/mapper/cryptsrc -o /dev/mapper/cryptdst

# Close LUKS
sudo e2fsck -f /dev/mapper/cryptdst
sudo resize2fs /dev/mapper/cryptdst


sudo cryptsetup luksClose cryptsrc
sudo cryptsetup luksClose cryptdst
And to my very positive surprise, I could even surpass the 360 MB/s data transfer rate of previous copy sessions with a slightly different setup. Overall, as already noted above, the 1 TB of data was transferred at an average of 490 MB/s or around 28 GB/min, and took around 35 minutes in total. Breathtaking!
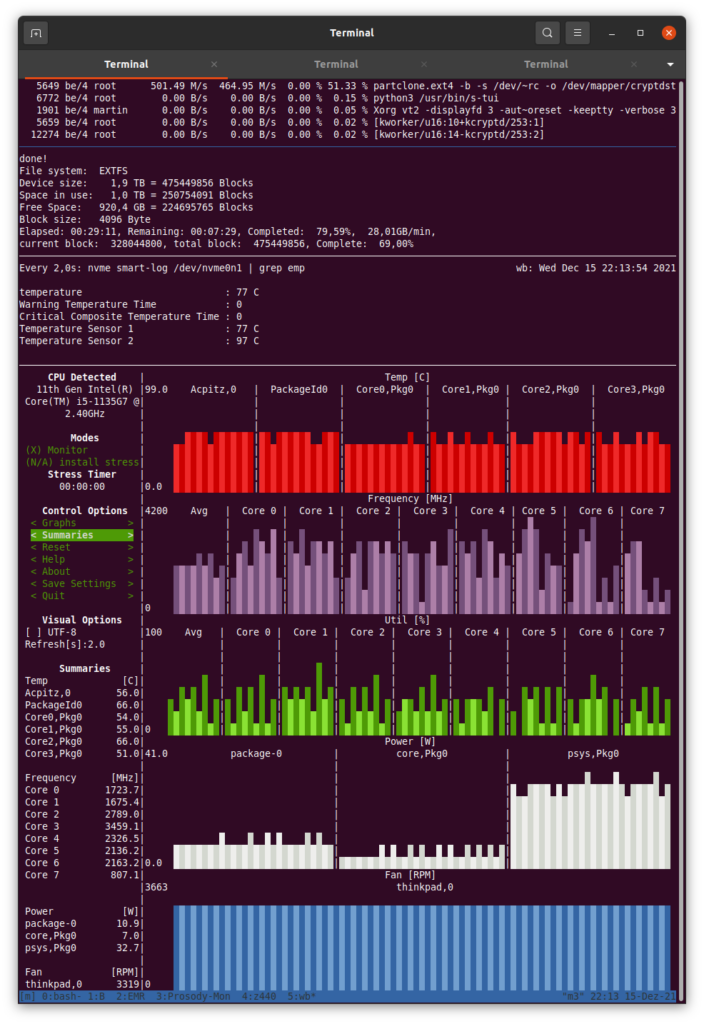
The screenshot above shows how the system behaved while copying the data. One thing that worried me a bit was, that the target SSD got quite hot in the process. Without additional cooling, the on board sensor reported a temperature of 97 degrees Celsius after a few minutes. The SSD did not slow down, however. I then decided to blow some air with a fan from below the notebook onto the target SSD. Thankfully, the Lenovo L14 has an air inlet at the bottom of the case just underneath the SSD. This reduced the temperature of the internal NVMe SSD to below 80 degrees Celsius. I’m not sure if that made the SSD feel better, but it certainly made me feel better.
So long story short, I was able to get very close to the maximum read data rate of the source SATA SSD and instead of waiting many hours, the job was done in a little bit less than half an hour. Excellent!
P.S.: The system monitor shown in the lower part of the screenshot above is ‘s-tui‘.