Finally, finally, some hands on stuff with AI in a blog post. After discussing some theory in part 1 and part 2 of this series, the first thing I wanted to explore was how I can run Large Language Models (LLMs) locally instead of using them in the cloud. After looking around a bit I saw two potential options for me: Ollma and LM Studio. As I wanted to have a solution I could run on a server without a GUI, I decided to go for Ollma, as it is an open source and MIT licensed command line solution to download and run LLMs. LM Studio is probably a good choice, too, but it is centered around a graphical user interface, which is not what I wanted to have for my initial ‘raw’ experiments.
Install
On my local server I have an Nvidia graphics card (GPU) which 8 GB of video RAM (VRAM), and I use Ubuntu 24.04 as operating system. 8 GB of VRAM is not much for playing around with LLMs, but even 4 GB of VRAM on the GPU are good enough for small experiments. To use Ollama with an Nvidia GPU, drivers need to be installed for the GPU. Fortunately, these were already on my server, as my ‘server’ is actually a notebook, so I didn’t need to do anything here. I considered two options to install Ollama: One option is to just download, install and run it directly on the server with a single line of bash instructions:
curl -fsSL https://ollama.com/install.sh | sh
The advantage: The command line installs everything that is needed. The disadvantage: You have to trust ollama.com. Another option: Install it via Docker Compose and encapsulate everything. Much better from a trust point of view, but this approach requires an extra library to access the Nvidia GPU from inside Docker containers. Since this was my first time installing Ollama and there was no critical data on the server, I decided to go for the straight forward approach. With the experience I have now, I would probably go for a Docker Compose install the next time and map the directory that contains the huge LLM files somewhere outside the container space. But I’ll keep that for next time.
Download
Once the install script finishes one can download one or more LLMs. For my first experience, I selected llama3.2:3b. The 3b stands for 3 billion parameters and easily fits into the 8 GB of VRAM of my Nvidia GPU. The command to get 2GB file is:
ollama pull llama3.2:3b
Run
Once downloaded, one can then run and interact with the model on the command line:
ollama run llama3.2:3b
So let’s ask something on the shell: ‘When was Julius Cesar born?“. The answer: ‘Julius Caesar was born on July 12 or 13, 100 BCE‘. Sounds about right. When asking more general follow up questions like ‘what is he famous for?‘, one gets a longer answer. Also interesting: The previous context is kept and part of the new input, because the answer is about Julius Cesar, while I asked in the third person in my follow up question.
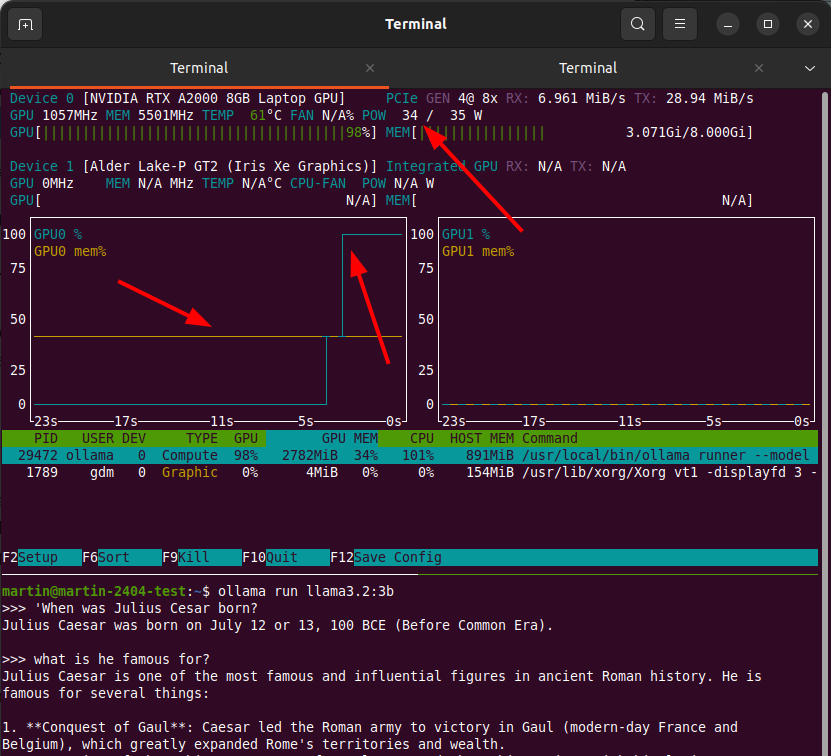
GPU Usage Visualization
Wow, my setup works! The screenshot at the top of the post shows how my questions were processed on the GPU with the nvtop command line tool. The brown line shows the amount of VRAM used, around 40% of 8GB in the case of llama3.2:3b. Once I hit the enter button to send off my question, you can see the green line went up to 100% GPU use while the answer is being returned ‘token by token’. The screenshot also shows that my ‘server’ is really a notebook with an Nvidia graphics card and that the maximum power the GPU can draw is 35W. That’s only a fraction of what an Nvidia GPU on a ‘real’ server with good cooling can use, but the speed at which answers are produced with the models that can fit into 8GB of VRAM is very much like what one would get on the web with ChatGPT, Perplexity, etc.
Different Models for Different Things
The next step was to download and experiment with other LLMs that would fit into my GPU. Huggingface is the platform to find models that one can then download and run locally with ‘ollama pull…’. New models for different use cases are published on a daily basis, so search the web a bit for which LLMs you want to try.
Small vs. Big – Your Mileage May Vary
And while this is all very fascinating, one point very quickly become quite clear: The LLMs one can load into 8G of VRAM are ‘very small’. On the web, ChatGPT and others use significantly larger models, and their answers are often much better. Also, they reference web pages in their answers, which this setup can’t (yet) do. But this is a major part of the exercise: To understand what is locally possible relatively cheaply compared to what can be done in data centers on hardware that costs tens to hundreds of thousands of euros.
It’s all in the Weights
Another important thing to realize is that the answers that are produced are based on the 3 billion ‘weight’ parameters that are the result of the initial training of the LLM, and the ‘structure’ of the LLM itself. Have a look at part 1 of this series if you don’t quite understand what that means, because it is of central importance to understand this from a logical point of view. The LLM does not ‘understand’ or ‘know’, it only predicts one character of the output after the other based on the input that was given. You will not find the word ‘Cesar’ or any other word of the question or answer of my example above in the LLM file that was downloaded. The answer was produced by pure brute force maths.
Summary and Next Steps
So far so good, I now have a setup to download and use LLMs locally. I can interact with the setup directly on the server, or I can SSH into it from my notebook and use the same command line. That’s exactly where I wanted to be after this first step and I now have a good basis to explore all the topics I described in the first post in this series. Part 4 coming up in a few days, so stay tuned!