 I recently wanted to dive a bit into how Bluetooth Low Energy, also referred to as BLE or Bluetooth Smart, works on the inside. One thing that is really helpful after looking at a lot of documentation and great resources on the web is to have a look at an actual trace. There are quite a number of good tools out there to make Wireshark traces but unfortunately it’s quite difficult to find downloadable BLE pcap files. Time to change this!
In practice there are two ways to trace BLE: The best way is to buy a BLE sniffer USB dongle such as the Bluefruit LE Sniffer for a few euros. That gives you access down to layer 2 and you can trace real communication between two BLE devices.
Another way to trace BLE is to use Linux and hcidump on a PC with a built in Bluetooth 4.0 chip or a separate Bluetooth dongle. While this doesn’t require additional hardware the disadvantage is that the trace is done at the Host Control Interface (HCI) level so you won’t see lower layer Bluetooth messages. This is what I’ve done for this blog entry and here’s the PCAP trace of the exercise.
As I didn’t have a ‘real’ BLE device to communicate with, I did the next best thing and used a second notebook with a Bluetooth 4.0 chip inside to simulate a BLE peripheral. This can be done with the following commands on the shell:
# Check if the BT device is up
hciconfig

# Configure an advertisement message “Hello world”…
sudo hcitool -i hci0 cmd 0x08 0x0008 1e 02 01 1a 1a ff 4c 00 02 15 e2 c5 6d b5 df fb 48 d2 b0 60 d0 f5 a7 10 96 e0 00 00 00 00 c5 00 00 00 00 00 00 00 00 00 00 00 00 00

# Switch on advertisements and make the device connectable
sudo hciconfig hci0 leadv 0
For details see here.
Once the simulated BLE peripheral is up and running one can then go ahead on the other PC and connect to it using the gatttool that is part of the Linux Bluetooth stack in many distributions. After reading the BLE spec about GAP, GATT, services, characteristics, attributes and handles you’ll immediately feel at home. The second screenshot shows what I’ve done and I’ll give a quick step by step walk through below:
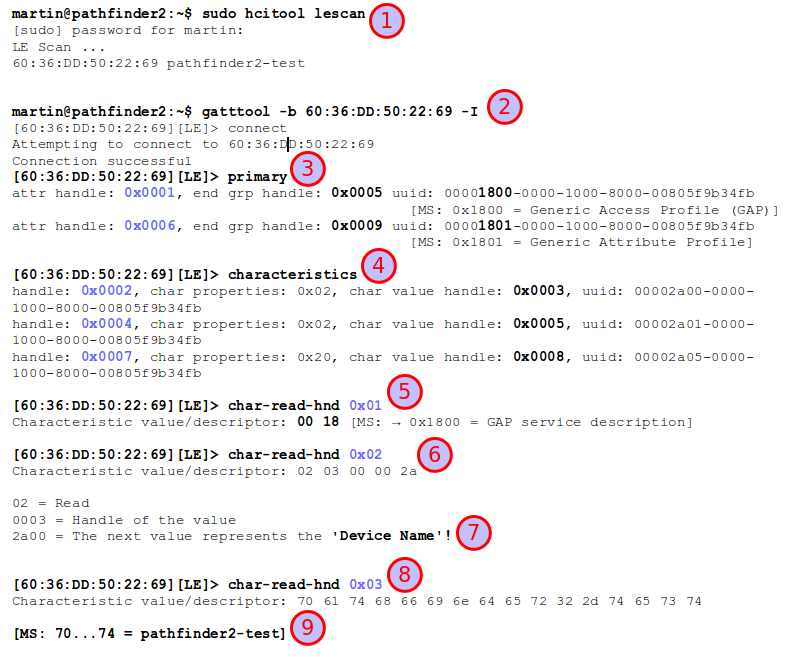
The first step (1) is to perform a BLE scan to find all BLE devices nearby that are advertising their services. This resulted in the BLE MAC address and name of my other notebook acting as a BLE peripheral.
Next (2) the gatttool (Generic Attribute Protocol (GATT) – Tool) can be used to connect to the device. The ‘-I’ parameter starts the tool in interactive mode. Step (3) after connecting is to ask the BLE peripheral device for all services it offers. As this was only a simulated BLE device it only offers the Generic Access Profile (GAP) service and the Generic Attribute Profile (GATT) service. Those aren’t really services at all but just give general device capabilities. Real BLE devices will have additional services, e.g. temperature, humidity, acceleration, etc. etc. services that have values one can read, or variables for actuators such as switches, etc. that one can write to.
Speaking of variables, BLE communication revolves around variables one can read and write to. Variables are referred to as Attributes in the BLE specification. A variable, i.e. an attribute, doesn’t only have a value it also has a description, i.e. what is its purpose, can it be read, can it be written to, does encryption have to be activated for the connection before the attribute is accessed, etc. The combination of description and the attribute value is called a characteristic. Characteristics are further grouped into services, i.e. a service can have several characteristics, i.e. several variables with their variable descriptions.
Let’s continue with the steps in the screenshot. In step (4) the ‘characteristics’ command returns a list of all variables of all services. Everything in BLE, be it a description of an attribute or the attribute itself is accessed via a 16 bit handle. In the screenshot there are 3 descriptions of attributes (variables) and their handles are 0x0002, 0x0004 and 0x0007. Handle 0x0001 was already used in step (3) and points to the service description that bundles several characteristics (i.e. variables).
In step (5) the ‘char-read-hnd’ command is used to read the attribute behind handle 0x0001. The value is 0x1800 which is the defined service identifier for the GAP service.
In step (6) the ‘char-read-hnd’ command is used to read the attribute behind handle 0x0002. As this handle directly follows the service identifier handle it contains information about the first variable the service offers. As can be seen in (7) the bytes returned describe that the attribute that is described is read only, the handle for it is 0x0003 and that the value represents the device’s name.
In step (8) the ‘char-read-hnd’ command is used to get the value behind handle 0x0003. The bytes returned are the ASCII values of the device’s name. If you go through an ASCII table or have a look in the Wireshark trace, the bytes decode into ‘pathfinder2-test’, the name I’ve given the PC which simulated my BLE peripheral (9).
This looks quite complicated at first but in essence this is a standardized way for a device to discover all services a BLE peripheral offers and which variables can be accessed via which handle number. While manufacturers are at liberty to define their own services and description of variables, there are standard BLE profiles for all sorts of sensors and actuators in which the description IDs are standardized which makes it easy to parse the capabilities of unknown devices that stick to standardized profiles.
Once a device knows which handles have to be used to get a sensor reading such as a temperature, a humidity value, etc. it can connect to a BLE peripheral and simply do a ‘read-char-hnd’ request to read the variable directly. No need to traverse the service tree again.