I’m almost happy with the basic hands-on understanding I have gained about Kubernetes about which I have written in part 1 to 3 of this series. I understand much better now how Kubernetes manages Docker containers, how it abstracts and manages the distribution of containers in a cluster of servers and how it makes services running in containers reachable from the outside world. From a developer and network administrator point of view, however, one important thing is still missing: How does Kubernetes manage persistent storage for containers? So let’s have a look at this and also experiment with a hands-on example: Running a WordPress Blog with a MySQL database in a Kubernetes cluster. As you will see, it’s not rocket science.

As explained in my Docker intro series, containers are ephemeral, i.e. all data modified or stored in the container itself is discarded whenever the container goes away. Therefore, databases and other applications running in containers need to have a way to store data persistently. In a Docker environment, a mechanism referred to as ‘volumes‘ is used to map a folder from inside the container to a path on the server on which the container is running. This way, a new instance of a container will get to the data again that the previous incarnation has left behind. So how does that work in a Kubernetes cluster?
In Kubernetes, this requires a bit of extra thinking because when a container, or to be more precise, a pod with one or more containers inside is instantiated, Kubernetes will run it on any server (worker node) in the cluster that is available at the time. In other words, mapping a folder inside a container to the filesystem of the worker node does not make sense, it has to be a more ‘generic’ place that can be reached from any worker node. So let’s explore how that works with the example I’ve already used in the Docker series: A WordPress installation.
As in the Docker WordPress example, two containers are used and both containers need persistent storage. In the Docker example the two containers we wanted to run are described in a docker-compose.yml file. This description also contained a ‘volume‘ section for the database and the WordPress container in which an folder in the container was mapped to a path on the server. The same principle is used in Kubernetes as well, but the description of the two containers looks a bit different. Also instead of one description file, one description file for each container is used in this example. As the descriptions are a bit longer I won’t post the full content here. Instead, let’s download the two ‘deployment‘ files directly into a new directory of our Minikube installation:
mkdir wpk
cd wpk

curl -LO https://k8s.io/examples/application/wordpress/mysql-deployment.yaml

curl -LO https://k8s.io/examples/application/wordpress/wordpress-deployment.yaml
When you look into the WordPress deployment file you will see the following configuration for persistent storage:
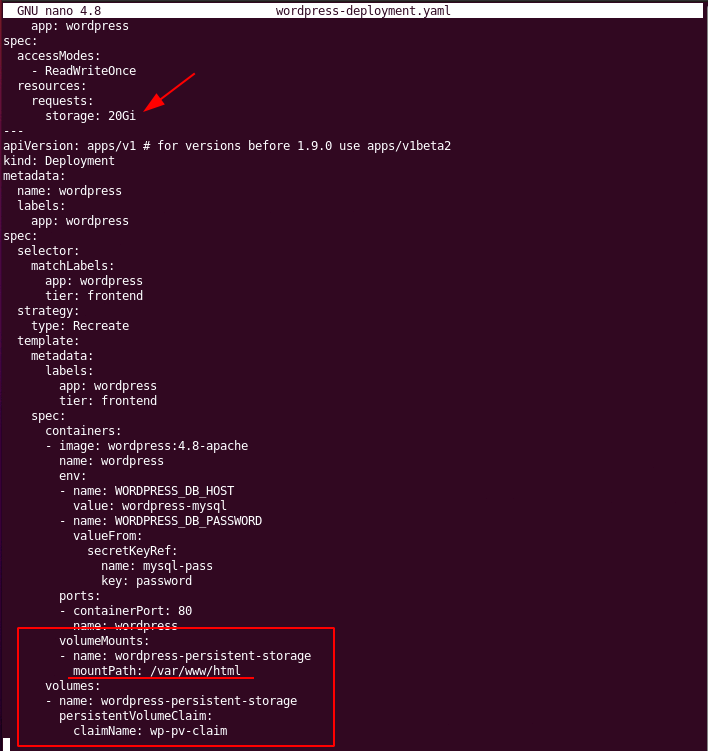
Note the ‘mountPath‘ which is the same as in the Docker example. Also note that instead of giving a path on a particular server where to put the data outside a container a ‘Persistant Volume Claim‘ is made with a ‘name‘ as an ‘identifier‘. In other words, this is a kind of indirect request. When starting the container, Kubernetes can look up in its cluster configuration where to create a folder that is to be mapped into the pod/container.
In our Minikube test environment, the folder is created in the host’s temporary folder path ‘/tmp‘. In other words: the data will be persistent even if the pods/containers are deleted and restarted. However, when you restart the server, your data is gone. That is fine for a test installation. In a production Kubernetes cluster, this will of course not do. Instead of a path on the control node that is used for persistent storage, there will likely be some sort of storage server where persistent data is held redundantly. Kubernetes can then create an object on this storage infrastructure and then map it into the pod/container. From the point of view of the software running inside the container this is all transparent. It just reads and writes data to and from ‘/var/www/html‘ in this example.
You will find a similar volume configuration, referred to as Permanent Virtual Claim (PVC) in Kubernetes, in the database deployment configuration file. Before we can use the two deployment files to create and launch containers in our Kubernetes Cluster, one additional file is required that binds the two containers together. It must be named ‘kustomization.yaml‘ (yes, with a k!) and looks as follows:
# nano kustomization.yaml

secretGenerator:
- name: mysql-pass
  literals:
  - password=YOUR_PASSWORD
resources:
  - mysql-deployment.yaml
  - wordpress-deployment.yaml
While in the Docker example, the password required by the WordPress container to access the database in the database container was part of the configuration file, it is put into a separate configuration in this Kubernetes example. That makes sense because this way, one can create generic WordPress deployment files and have the secret stuff somewhere else that changes from deployment to deployment.
By now we have three files in our directory:

And that’s it, we can now push our WordPress deployment into the Kubernetes cluster. When we do this for the first time, Kubernetes will download all required images from the image hub and then do its magic around it. Unlike in the Docker example, there isn’t much feedback on the console, so you have to be patient for a minute or two before everything is in place.
kubectl apply -k ./
You can see Kubernetes working on this by going to the web dashboard, the graphs and entries will change as pods are created and started. Once done, use the following commands on the console to see the pods, persistent storage and services have been created:
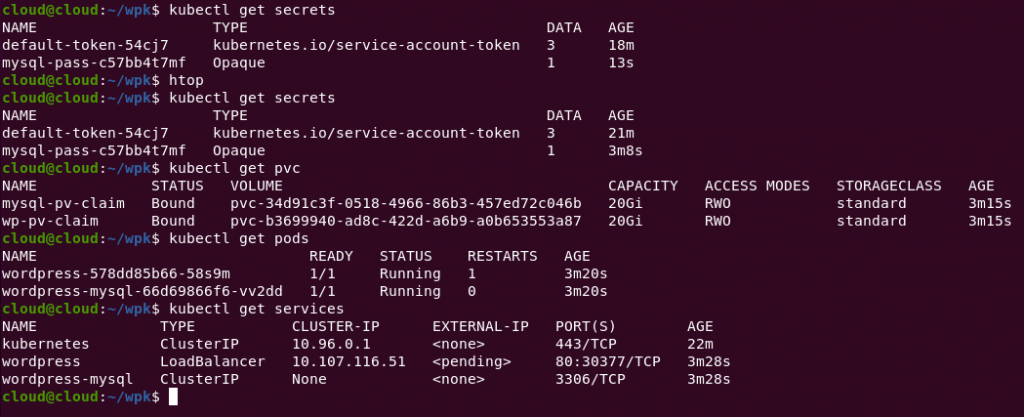
kubectl get secrets
kubectl get pvc
kubectl get pods
kubectl get services wordpress
Here’s a screenshot as it looked like on my test server:
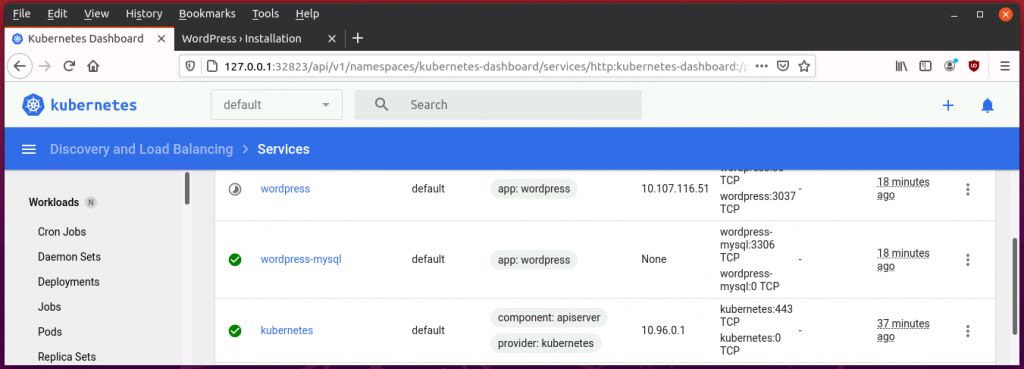
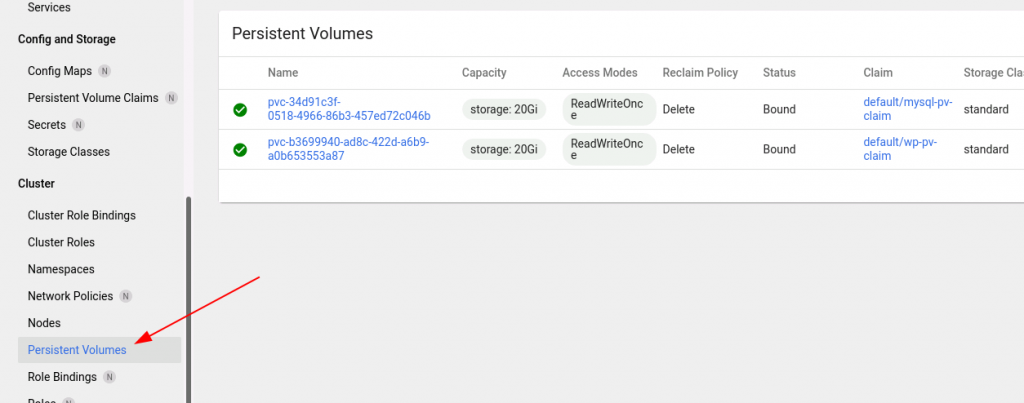
You can see the same information on the Kubernetes web dashboard as well but it’s distributed all over the place. We’ve been after the persistent storage in particular, however, and on the dashboard you can find the two persistent volume claims of this project as shown in the following screenshot:
And finally, we want to see that our two pods/containers actually work. For this, we map port 80 of the WordPress pod running in the cluster to a random TCP port on the outside with the following command and then copy/paste the resulting URL to a tab in the web browser:
minikube service wordpress --url
And voila, if everything has worked, you should be welcomed by the WordPress installation dialog.
So much for the quick intro into deploying a real application with persistent storage into a Kubernetes cluster. For more details have a look at this page in the Kubernetes documentation that goes through this whole process with lots of additional details and references what one has to do in addition concerning security, etc., if you want to deploy this on a real cluster.