After the six ‘Dockerize Me‘ and four ‘Kubernetes Intro‘ episodes that mainly dealt with getting a good understanding of how to use containers, the time has come for me to deal with the ‘end boss‘ of the game: Dockerizing the web-based database system I’ve been working on in my quality time over the years.
I have played with the thought of open-sourcing the code for some time, but installing Apache, MySQL, SSL certificates, etc., etc., and configuring the system is beyond most people who would be interested in using it. But putting the system in containers for easy deployment, operation and upgrades would change the game. So in this and the following episodes, I give an overview of the steps I have taken to containerize my system. I think the time two write this down is well invested, as the steps I have taken are a good blueprint, and will perhaps also be useful for your future projects.
Things To Be Considered
In theory, putting a server-side installation into a container is straight forward: Just use what you have and build the ‘server’ inside the container. In practice, however, there are a several things to consider:
- The application should be split into several containers instead of putting everything in a single big one, especially if a database is involved.
- Configuration files and data storage should be exposed to the outside world to make them persistent.
- Environment variables are required as an alternative to configuration files for some parameters.
- TLS and certificates for secure communication between a web-browser and server should be done by a reverse proxy.
- It should be possible to perform software updates with a simple command (e.g. docker pull). No further steps should be necessary.
So let’s have a look at the first point. My web database runs on Apache and I’ve used PHP for the server-side code. All data is stored in a MySQL database. In other words: A classic LAMP stack. The classic way to dockerize such a setup is to use two containers: One for the database, and one for the web-server and server-side application. Data is then exchanged between the two containers over an internal Docker IP network. Such a configuration does typically NOT use TLS encryption towards the web-browser. This is typically left to a reverse proxy setup that also runs in containers and additionally takes care of certificate renewals and other security-related things. This makes the setup much easier to maintain. Furthermore, it has the additional benefit for testing purposes that one can set-up the system quickly with two containers, use it over an unencrypted HTTP session first, and then deal with the reverse proxy setup later. So in total, the solution consists of 2 containers for my application and 3 containers for the reverse proxy setup as shown in the drawing below. The only parts that come from my side are marked in green. All blue elements come ‘out of the box’ from somewhere else.
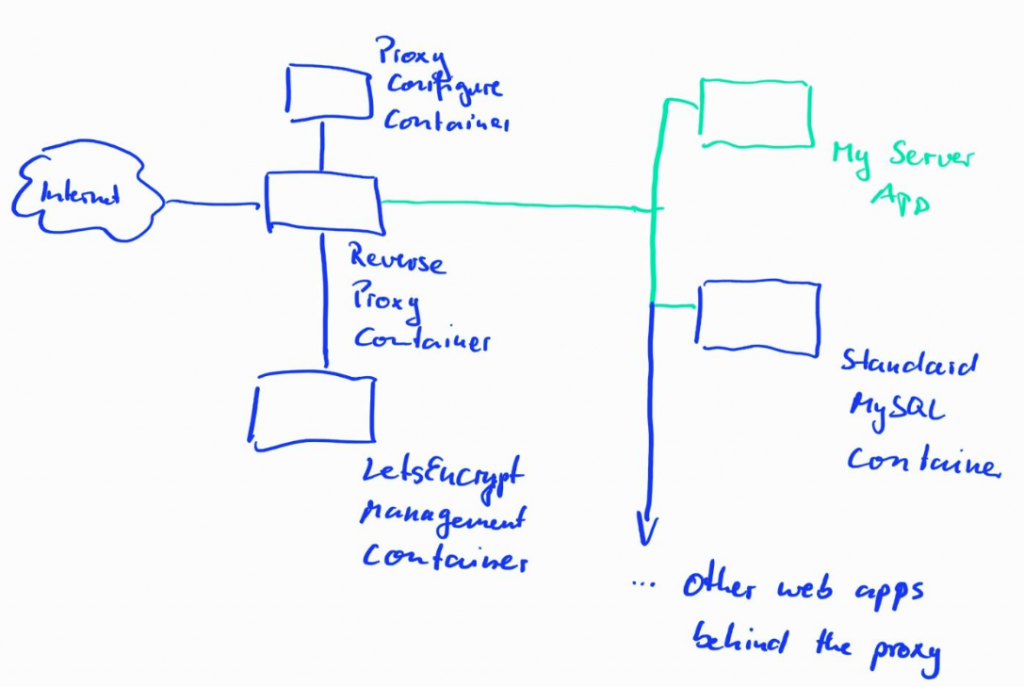
This sounds and maybe looks a bit complicated at first. However, since the MySQL image and the 3 images for the reverse proxy setup come from Docker Hub, run out of the box, and can be used as a frontend for many other containerized apps on a server, I wouldn’t count them into the ‘problem space’ for my application.
Initializing Named Volumes
When I first started the project I assumed that Docker would take care of automatically initializing volumes for persistent storage when they are initially created. I further assumed that if the directory for the volume did not exist, Docker would just copy all files that are mapped from the inside of the container to the outside world. It turned out, however, that this is NOT the case, particularly not for named volumes to a given directory path. This puzzled me for a long time. The official documentation is quite clear about this if you know what to look for, but is not very helpful in guiding a newbie to a solution.
In my particular case, I wanted several directories mapped from the inside of the container to a path on the server in the project directory (which is referred to as a ‘named volume’). This makes the configuration files persistent. The mapping is created easily in a docker-compose file as shown in previous ‘Dockerize Me’ parts, but they would always end up empty when I started the container for the first time. This would not do for easy deployment and I thought for a very long time that I must be doing something wrong. But it turned out that I didn’t and that my code has to make sure that named volumes are populated with default configuration files if they are empty, i.e. when a container runs for the first time. So the solution I have come up with for me is to not start Apache straight away when the container starts, but to check first if my configuration directory is empty. If empty, I populate it with default config files and only then start Apache. This in turn requires that during image creation, I have to make a copy of the files in this directory to another directory in the container to be able to copy them to the empty directory. The other option would have been to change the server-side code of my application to perform this automatically. However, I didn’t want to do that because Docker containers should be just one way of setting-up the system. Long story short, here’s how this looks like in practice:
In the Dockerfile that is used to build the image in the first place, I created a ‘backup’ directory and copied all config files into it. It’s important to realize that this code only runs once while the image is built!
# Now copy all files that should be exposed to an external volume
# to a temporary directory. run.sh below will check if these
# files exist when the container is started. If not the files
# will be copied back in this shell file!

RUN mkdir /x-backup
RUN cp /config-dir/* /x-backup

[...]

CMD ["/bin/bash", "run.sh"]
The second change I made was that instead of starting the Apache web-server straight away when the container starts with the CMD command, I run a shell script (‘run.sh‘) that checks if the config files are in /config-dir. If that directory is empty, it will copy the files and only then start the Apache webserver. It’s important to realize at this point that this code will run every time a container is started and not only once like the code above.
Here’s how run.sh looks like:
#!/bin/bash

# Copy config files to paths that should be used as a volume outside
# Option -n is used to NOT overwrite config files that already exist in the
# volume paths (i.e. init only!)

cp -n /x-temp/* /config-dir
chown -R www-data:www-data /config-dir

/usr/sbin/apache2 -D FOREGROUND
The ‘-n’ parameter is the magic element in the ‘cp’ command, as files are only copied if they do NOT yet exist at the destination!
Perhaps there is a better solution for this, but I haven’t been able to find one on the net. If you know of one, please let me know 🙂
Summary and Outlook
So far, so good, I have a working container now, and configuration files are persistent between container invocations. In the next episode, I’ll have to look at how I make my server-side code communicate with the Mysql database in another container.
OK, I skipped your previous posts on Docker (tl;dr), so I would appreciate it if you would provide links where you explain terms like “named volumes”, etc.
I tagged them all, so you will get the full selection with: https://blog.wirelessmoves.com/tag/dockerize-me