Every now and then I meet congestion out there in the cloud. And sometimes, particularly in the evening, a transit or peering link between networks is so congested, that packets are frequently dropping, and data transfer speeds are down to a few megabits per second. Not a very ‘sparkling’ experience one would probably say in the backbone community in Italy.
Anyway, if you are in the ‘engine room’ of a network operator, you could of course do something about this and find another peering or transit partner for a particular destination network. But I’m unfortunately not in such a position, so I needed a way to ‘route around the problem’ on a higher layer of the protocol stack. The solution: Multiple proxy jumps with ssh.
Multiple proxy jumps with ssh were a bit of a pain on the command line and also via the ssh configuration in the past. However, in recent ssh versions, some nice options have been added that make the syntax a lot more approachable.
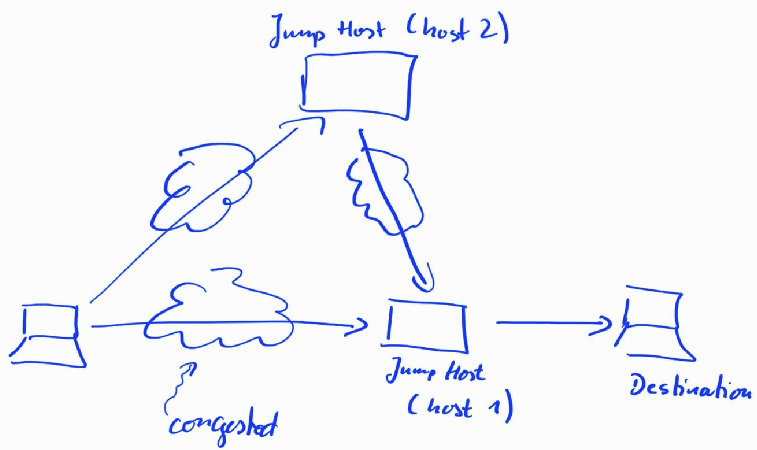
The hand drawn picture above shows how to route around the problem on layer 7 instead of layer 3 of the TCP/IP protocol stack. Typically, I use SSH for remote shell access for scp/rsync data transfers, and for securely using VNC. Typically, there is a ‘jump’ host server at the entry to the destination network, which requires one ssh redirection when accessing the remote host. Recent versions of ssh have the convenient ‘-J’ option to take care of this:
ssh -J user1@host1.com:4444 martin@destination.com -p 5555
This command first establishes an ssh connection to host1.com. On this host, ssh uses port 4444 instead of the default port to keep script kiddies from trashing the authentication logfile. Once that ssh tunnel is in place, another ssh connection is then made through that tunnel to destination.com. Again, a non-standard ssh port is used (5555).
When congestion occurs on the route, I do a ‘double proxy jump’ via an ssh server on a completely different network in the cloud, which has different transit and peering relationships. The command then looks as follows:
ssh -J user2@host2.com:6666,user1@host1.com:4444 martin@destination.com -p 5555
This way, a tunnel to host2 on a different network is established, through which another ssh tunnel is then established to host1 (the gateway). And finally yet another tunnel is established through the other two tunnels to the destination host. A tunnel through a tunnel through a tunnel.
Obviously, ssh connection establishment takes a little bit longer, but it’s well worth the extra second if I can evade the transit or peering congestion on the ‘normal route’. And just for fun, two indirections do not seem to be the limit for the ssh -J option.
And for a more permanent setup, the -J option can also be used in ssh’s config file, which is usually located in the ~/.ssh directory. And here’s how a double indirection would look like in there:
Host host2
 HostName host2.com
 Port 6666
 User host2

Host host1
 HostName host1.com
 Port 4444
 User user1
 ProxyJump host2

Host destination.com
 HostName 192.168.99.244
 Port 5555
 User martin
 ProxyJump host1
Note that the final host does not have a domain name. Instead, I’ve used an IP address in the example. Previously, the same could also have been done with the ssh “ProxyCommand” option and netcat (nc), but the syntax does not look as straight forward than with the ProxyJump option.
And there we go, evading layer 3 congestion via ssh tunnels on layer 7 has never been easier! For further details, have a look here.