In part 5 of this series, I’ve been looking at how companies like Linode, DigitalOcean and Amazon offer managed Kubernetes cluster instances. In other words, they provide Kubernetes clusters in freely configurable sizes, which can then be used for projects. The approach is quite different from how I thought it would work: Effectively, you get your own Kubernetes cluster(s) that work and feel the same way as any private Kubernetes installation, be it a Minikube, which I explored at the beginning of this series, or be it a huge private cluster installation. So how hard can it be to run the same exercises on such a managed remote cluster as on the Minikube?
It turns out, it’s not hard at all, as it is exactly the same. For my learning process, I decided to get an account at Linode and another account at Digital Ocean, just so I could see the differences in how companies offer managed clusters. It turns out that both pretty much work the same.
Creating the Cluster and Installing the Tools
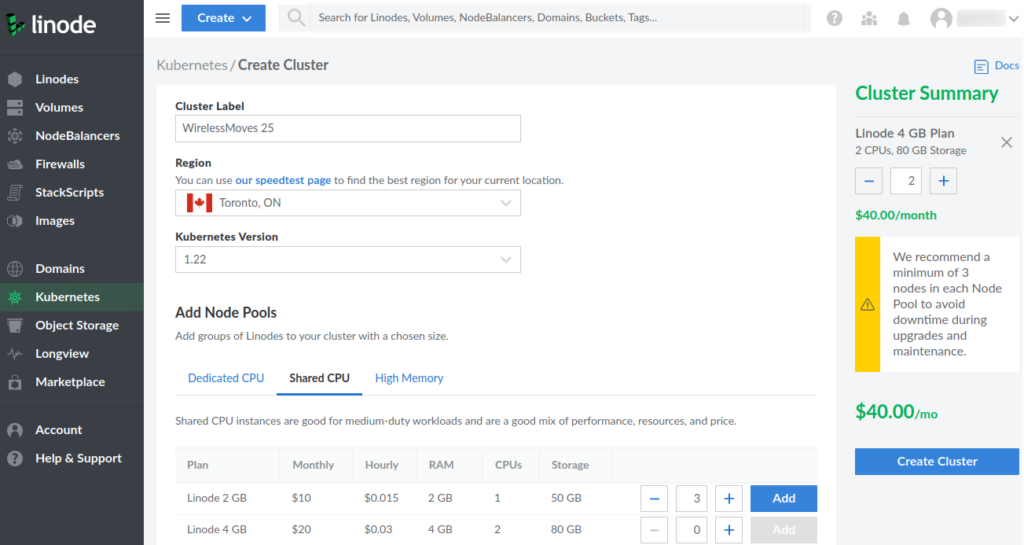
The screenshot above shows how a managed cluster is initially created on Linode’s web interface by selecting a name (Cluster Label) for it, selecting in which data center you want to have your worker nodes, which Kubernetes version you want to use and how many worker nodes you want to have. For my experiments I chose two worker nodes with 4 GB of RAM and 2 CPUs each. This setup would cost $40 a month, plus the cost for the Ingress load balancer (more details below) and for additional block storage that is automatically added to the cluster when an application requires persistent virtual (pv) storage (see earlier articles in this series). Fortunately, Linode and DigitalOcean bill by the minute and not by month, so the cluster can easily be destroyed after testing to keep costs down. Also, both infrastructure providers have free tiers available, so one can test things for some time for free.
After creating the cluster on the Web GUI, it takes a few minutes until all resources become available. At the end of the process, one can download a kubectl configuration file that contains, among other things, an access token, so the kubectl shell command knows where to connect to. If you haven’t installed kubectl so far, here’s how it is done on Linux:
# Download the version that matches the cluster version
# (1.22.0 in my case)
curl -LO https://storage.googleapis.com/kubernetes-release/release/v1.22.0/bin/linux/amd64/kubectl

sudo cp kubectl /usr/local/bin/kubectl
sudo chmod +x /usr/local/bin/kubectl

kubectl version
In addition, I’ve set ‘k’ as an alias for kubectl as typing ‘k’ is much more convenient than always typing ‘kubectl’.
# Declare to which cluster to talk to
# with full path so I can go into other directories
# with kubectl
export KUBECONFIG=/home/martin/k8s/test4-kubeconfig.yaml

# k shortcut
alias k=kubectl
Once the export and the alias are in place, one can check if connectivity to the control plane of the cluster works and if the worker nodes are up:
# show the status of the 2 worker nodes
k get nodes

# show detailed status of pods, services, deployments, etc.
k get all
Get Ingress Working with Helm
In the Minikube example at the beginning of the series, this was the point where I started to install a number of ‘hello world’ services into the cluster and then make the services available to the outside world. This was a bit of a shortcut, however, as I exposed the IP address of a worker node and a TCP port that lead to the app. That’s good enough for a local test installation, but in a real cluster in a data center, one wants to have a proper Kubernetes Ingress component. Ingress accepts http and https requests on the standard ports 80 and 443, and then decides to which service in the cluster to forward it to based on the given domain name (e.g. http://my-app.example.com).
Setting up Ingress sounded difficult to do. However, with Helm, another interesting Kubernetes tool to deploy applications into the cluster, it is actually straight forward. I’ll will write more about Helm in a future post but for now, just see Helm as an easy way to deploy an application into the cluster. To use Helm, it needs to be installed first:
# Get the version number of the latest Helm release
https://github.com/helm/helm/releases

# Get the binary and untar it
wget https://get.helm.sh/helm-v3.7.2-linux-amd64.tar.gz
tar -zxvf helm-v3.7.2-linux-amd64.tar.gz

# And move to a place that is reachable from everywhere
sudo mv linux-amd64/helm /usr/local/bin/helm
Once Helm is there, installing the “Nginx Reverse Proxy Ingress” App is done by adding the repository that contains the “Helm Chart”, i.e. the configuration files for this application, to Helm and then to install it:
# Let's get ingress up and running, install with a helm chart
# From Googles Kubernetes repository
# (and not default Decker Hub!)
#
# Note: Name for deployment is nginx-ingress,
# (parameter after 'add', but that's just a name!
#
helm repo add ingress-nginx https://kubernetes.github.io/ingress-nginx
helm repo update
helm install nginx-ingress ingress-nginx/ingress-nginx
This will take a few minutes and once done, ‘k get all‘ should show a pod, a service and a deployment for the ingress controller. Make sure the ingress pod is in status ‘running’ and an “EXTERNAL-IP” is visible next to the service.
Next, I installed two ‘hello world’ apps by using the two hello world yaml files from this page. These yaml files are rather short and just define a service and a deployment that loads the nginxdemos/hello image from Docker hub and creates a service with a Cluster IP, which is not accessible from the outside world.
Installing the two nginx demos is done with one command each:
k create -f hello-one.yaml
k create -f hello-two.yaml
Again, it takes a minute or two for the pods to become available, and ‘k get all‘ will then show the pods in status “running”. There are also two services with a Cluster IP each, but they do not have an external IP address. Before going further, there’s one other interesting behavior: Each deployment will spawn 3 pods, i.e. 3 replicas! In other words, each app has 3 pods and each has an nginx webserver inside. We’ll see in just a minute how this is put into good use.
The final piece missing is to connect the hello-one and hello-two service to the ingress, i.e. make them accessible from the outside world. Here’s a yaml description that tells ingress what to do:
apiVersion: networking.k8s.io/v1
kind: Ingress
metadata:
  name: my-new-ingress
  annotations:
    kubernetes.io/ingress.class: nginx
spec:
  rules:
  - host: blog.example.com
    http:
      paths:
      - pathType: Prefix
        path: "/"
        backend:
          service:
            name: hello-one
            port:
              number: 80
  - host: shop.example.com
    http:
      paths:
      - pathType: Prefix
        path: "/"
        backend:
          service:
            name: hello-two
            port:
              number: 80
Save it as my-ingress-rules.yaml and apply it with:
# Create the rules
k create -f my-ingress-rules.yaml

# Wait a bit and then check if the rules were applied correctly
k describe ingress

# Check the external IP address used by ingress
k get services
The example above binds hello-one to http://blog.example.com and hello-two to blog http://shop.example.com. Now these are imaginary domain names and don’t really point to the ingress of the cluster. So you can either use real domain names you own and point them to the ingress IP address via DNS or put them in your local /etc/hosts directory, so you don’t actually have to own them.
And that’s it, now you can access the two services via the two domain names. Reload each page a couple of times and you will notice, that each time a different pod of each service is used. That’s the load balancing function of the deployment / service! Very nice!
Pitfalls
So by and large, with the knowledge gained so far, the bring-up and first use of a managed Kubernetes cluster is straight forward. During the process however, I stumbled over a few things that the system fortunately pointed out, if you know where to look:
The first thing I stumbled over was that the image for the ingress pod would not deploy. After opening a ticket with Linode, I was told that this is unfortunately a temporary error due to Google blocking the IPv6 range of the cloud data center in Frankfurt for downloads from its pod image repository (where the ingress image is hosted that Helm installs). A number of fixes were suggested and the quickest one was to use a different Linode data center. I then selected the data center in London and ingress installed just fine.
A couple of days later, when trying to deploy apps that required permanent virtual (pv) storage, Linode had a bit of trouble to automatically create block storage volumes for them. I didn’t open a ticket for this because an hour later the problem was gone.
And yet another thing I stumbled over was that the amount of resources I could create after being newly registered. At some point, permanent virtual storage creation would fail again because I had exceeded the number of virtual block storage devices I could have at the same time. I’m not sure what the exact number is, but it must be somewhere in the order of 10. This can probably be fixed by opening a service ticket.
Also, sometimes one has to be patient when deploying things. On DigitalOcean, for example, I sometimes have to wait 5 minutes after the ingress pod has started until the ingress service actually gets a public external IP address.
Summary
I very much liked my first excursion to the managed Kubernetes cluster domain. I’ve tried the things I’ve shown above with both Linode and DigitalOcean clusters, and they work in just the same way on both. That’s good to know, as it demonstrates that one can move between infrastructure providers without modifying any Kubernetes related configuration files. Note, however, that I did not use provider specific APIs to create, modify or destroy the managed clusters.
More to Come…
So far so good, but that’s just the beginning. In further episodes, I will have a look at how to deploy a self developed web app into a managed Kubernetes cluster, how to get a WordPress blog with permanent virtual storage running, and I plan to have another look at what it is that ‘Helm’ actually does. So stay tuned.
And Some Helpful kubectl Commands
# k shortcut
alias k=kubectl

# Overview of pods, services, deployments
k get all

# Also show other namespaces to see the control plane stuff
k get all --all-namespaces

# Get list of all nodes
k get nodes

# Get detailed status of a worker node
k describe node pool-r429hvlrs-ulrls

# Get the status of all worker nodes
k describe nodes

# Get Ingress rules
k describe ingress

# Get logs from a pod.
# If it has crashed use --previous to get the logs from while it was running
k logs mongodb-0 --previous

# Update a deployment
k apply -f ...

# Delete a deployment
k delete deployment NAME # (without.yaml at the end)
k delete service NAME # (pods are delete with the command above but the service stays...)

# Get a shell inside a pod, either sh or bash
k exec -it pod/wordpress-56fdc6b844-24skh  -- /bin/sh
k exec -it pod/wordpress-56fdc6b844-24skh  -- /bin/bash

# Have a look at cluster log messages / events
k describe events