
When we are talking about the 5G Core and implementations based on containers the story does not end with Docker containers. As a 5GC is not only based on one server and needs lots of redundancy, a management (orchestration) tool is required to manage containers across a large number of servers. There are several tools for this but it seems that Kubernetes is the tool of choice for most these days. I did a lot of reading about Kubernetes but the whole thing was still too abstract for me no matter how much I read about it. So I decided to get some hands-on experience myself. Here’s how I went about it in case you’d like to give it a go as well.
Note that the following tutorial doesn’t use any 5G core related micro services in containers, it is intended to be an introduction to Kubernetes in general so I’ll use software in containers that is easier to come by: Databases, Web Servers and WordPress instances.
Hello Minikube!
Fortunately, the Kubernetes team came up with Minikube, a small and easy to install Kubernetes cluster that can be used for training and testing. The word ‘cluster’ is a bit overstated here since Minikube only uses a single server (worker node) in the ‘cluster’ it managers. And even that single server is simulated on the local machine so no complicated setup is necessary.
Minikube can use different types of simulated worker nodes in which containers are executed. The one most easy to understand is that the worker node is installed in a virtual machine that runs on your notebook. The second option is to install Docker on your notebook and run the worker node in a Docker container. That’s kind of a Docker in Docker installation and a bit mind-boggeling perhaps. However, I chose to do just this because I wanted to use a virtual machine with a GUI for testing because I did not want the Kubernetes software to be installed directly on my notebook.
So the first thing to do before installing Minikube is to get a working Docker installation. Only a few shell commands are required and you will find them in part 1 of my Docker series.
Kubernetes Parlance
Kubernetes is a mighty tool to manage containers on many servers at the same time so it has lots of flexibility built-in. This comes with a number of concepts on top of those you should know from Docker. This web site gives a good introduction to the terms so you should read them first to get a rough understanding what is behind the following terms:
- (Worker) Nodes
- Containers
- Pods
- Replication Controller
- Labels
- Selectors
- Services
Let’s Install Minikube and Kubectl
At this point I assume you have a working Docker installation on your notebook or in a VM with a graphical desktop. It’s important to have a graphical desktop because Minikube keeps most things that can be accessed via the Web browser on an internal Ethernet interface. Therefore, accessing the Minikube installation from another machine over the network is not impossible but it is a major pain.
For Debian based systems, Minikube is already packaged into a .deb binary and can be downloaded and installed as follows:
curl -LO https://storage.googleapis.com/minikube/releases/latest/minikube_latest_amd64.deb

sudo dpkg -i minikube_latest_amd64.deb
And that’s it, your Kubernetes cluster is ready to run!
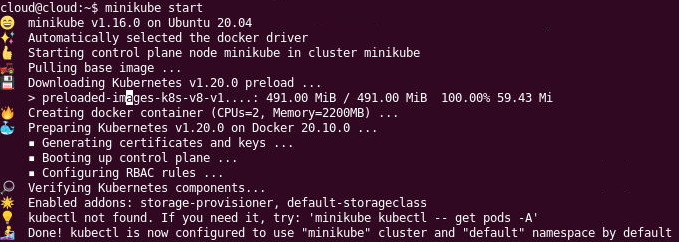
minikube start
This will take a minute or two as Minikube will download the latest Kubernetes image and install the worker node. Once the procedure is finished you will see this:
On the command line, Kubernetes is configured with the kubectl command. Minikube does not install this on its own and so it will complain on startup that kubectl is not found. Don’t install kubectl from the Ubuntu repository, it is likely too old. Even the snap variant was too old when I tried. Instead, download the binary and move it to /usr/local/bin as follows:
curl -LO https://storage.googleapis.com/kubernetes-release/release/v1.20.0/bin/linux/amd64/kubectl

sudo cp kubectl /usr/local/bin/kubectl
sudo chmod +x /usr/local/bin/kubectl

kubectl version
The version command will then show you if client and server version are the same (v1.20.0) in my case. This might have changed by the time you read this. So in case the version numbers differ, repeat the procedure for the correct version number in the URL.
Let’s Deploy A Container into our Mini Kubernetes Cluster
So Kubernetes is running and we have the command line tool set up to interact with the system. So let’s deploy a container into the ‘cluster’. For starters, let’s use an existing ‘echoserver’ image. This image contains a web server and a little application that returns a web page with all http parameters that were received for a request sent by a web browser.
kubectl create deployment hello-minikube --image=k8s.gcr.io/echoserver:1.4

kubectl expose deployment hello-minikube --type=NodePort --port=8080
If things have worked you’ll just get a one liner on the shell that the says that the deployment has been created and that the service has been exposed. The two terms are important, we will come back to them later.
At this point the ‘echo server’ is running inside a container in the cluster and we need one more command to access the service via the web browser on the notebook:
minikube service hello-minikube
This command will make port 8080 from inside of the cluster accessible to a local web browser on the notebook. The result of the command will tell you the URL to use in the web browser. Here’s an example:

After copy/pasting the URL into your web browser, you’ll see the output of the web server that runs in the service which represents a container in a pod:
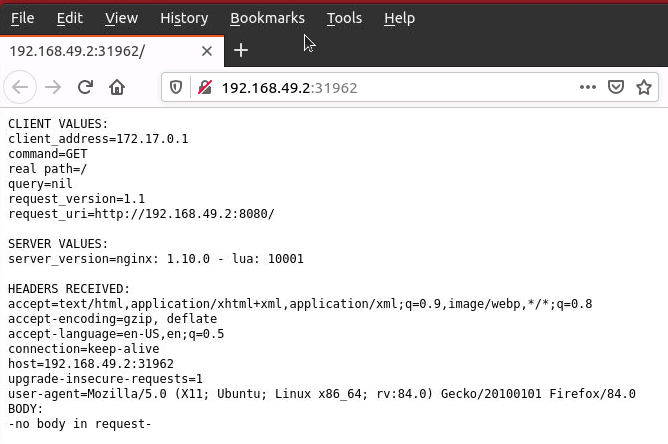
The keen observer might have noticed that 192.168.49.2 is a virtual Ethernet interface on the notebook that was created by the Minikube installation. It is also possible to expose the service on the localhost interface (which can be accessed remotely over ssh port forwarding). Here’s how that is done in case you are adventurous:
kubectl port-forward service/hello-minikube 7080:8080
This makes the echoserver available on http://localhost:7080.
That is all nice and well, but…
Yes, so that is all nice and well but where is this powerful Kubernetes web based management interface everybody is talking about? Well, it’s inside the Minikube installation of course and you can access it by exposing it to the outside world on localhost with the following command:
minikube dashboard
Once done you the command will give your the URL with which the Kubernetes dashboard can can be opened. There’s lots to discover there and I will describe this in the second part of this Kubernetes introduction. Until then, have fun exploring for yourself and stay tuned!