Every now and then I am at places at the fringe of the observable Internet where I only have slow, weak and unreliable connectivity. Typically, though, there are several of such networks to chose from, for example because network operators share towers. Wouldn’t it be great if one could combine those networks to get some more speed and reliability out of it? Until recently, I wasn’t aware of an easy way to do this. But then I noticed a world traveler on Twitch who regularly streams while driving, even at remote places. His solution: Combining Internet connectivity from a Starlink dish on his RV’s roof and two cellular connections with a software called Speedify on a Raspberry Pi. Hm, sounds like this is just what I need.
For my taste, the Speedify web site looks a bit too colorful and blinky, I’m probably not their main audience. Also, I saw references to a free trial and a free tier, but couldn’t actually find the place to sign-up for this. But the solution sounded interesting enough, so I signed up for a month to give it a try.
Installation
I got the impression that their customer base is mostly interested in combining cellular and Wifi on smartphones for real-time uplink streaming, so that’s what they probably mostly focus on. However, they also offer a Linux version for Ubuntu on servers and notebooks, as well as for Raspbian OS. So I used their installer script on a Pi. On Linux, Speedify can be configured on the command line, but also offers a GUI. A GUI is probably easier for starters, so I used the GUI version and VNC to access the Pi’s virtual screen remotely. The installer script hooks into ‘apt’, so software updates will be installed on the Pi automatically. While the description says that Speedify’s GUI will also be installed during the process, this was not the case when I tried, so I had to install it manually with ‘apt install’. Once done, a program icon appears in the ‘Internet’ section of the GUI’s start menu.
First Use As a Gateway
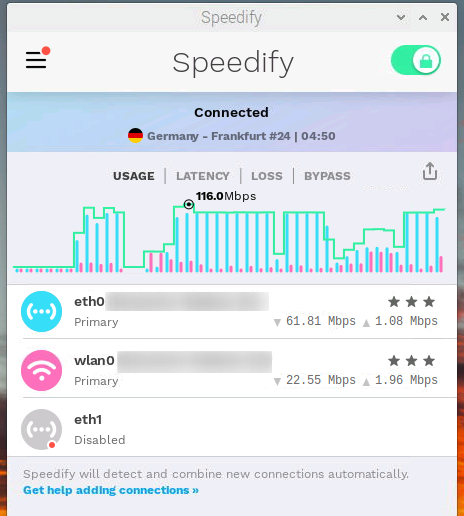
Despite the GUI, it took me a while to figure out how to make Speedify act as a router for other devices. For my tests, I used the Pi 4’s internal Ethernet port, the internal Wi-Fi, 2 USB-to-Ethernet adapters and 2 Wi-Fi dongles. By default, the software bonds all Internet connectivity it can find on the Pi for use on the device. To exclude a Wi-Fi or Ethernet port from bonding and to use it for sharing the bonded Internet connectivity to other devices, it has to be excluded in Speedify’s settings. This can’t be done on the GUI, which puzzled me for some time, as it offers so many other options, such as prioritizing links, to only use links in case others fail, etc, etc.. Instead, this particular option has to be configured in /etc/speedify/speedify.conf, where one finds sharing options for Ethernet and Wi-Fi links. It seems the GUI is mainly for on-device sharing, and was not extended to also cater for my use case. Not a big issue, but it took me a while to figure this out. A note in the instructions would have helped. Declaring an interface in Speedify’s config file for sharing also activates NAT and DHCP on that link. That’s a nice touch!
Wi-Fi on the Pi is a Mess
For my tests, I used one VDSL backhaul link over Ethernet, and two LTE/5G connections, one over Wi-Fi, the other over Ethernet to an LTE router. As the Raspi 4’s built-in Wi-Fi gave me a constant headache by sometimes finding my wireless networks and sometimes not, or finding my networks but not connecting to them, I disabled it after some time and used two Wi-Fi USB dongles instead. These worked reliably.
To share the bonded links, I used one of the USB attached Ethernet ports, an Ethernet switch behind it, and two notebooks. Wi-Fi sharing would have been more realistic, but I wanted to have an end-to-end connection over cable to remove any effects from Wi-Fi.
Throughput and Redundancy – The Elevator Pitch
Once set-up, I used my setup and did my daily work by exclusively using Speedify’s bonded connection. There is a bit of added latency, which is to be expected, but I rarely noticed it. While the bonding didn’t take advantage of the three high speed links in the downlink direction and on average delivered little more than the 100 Mbps offered by the single VDSL backhaul link alone, uplink bonding worked a lot better, with about 70% of the total capacity used. The main advantage for me however: Any 2 of the 3 links can fail and connectivity is not lost. Even ongoing TCP connections survive and one only notices that not all links are connected when transferring larger files.
So much for today, more details in part 2.