Raising the Shields Part 13: Secure Remote VNC Desktop with a Raspberry Pi SSH Bridge

I do a lot of remote computing support for my family members and so far used VNC remote screen viewing over an unencrypted connection for the purpose. This is obviously far from perfect from a security point of view but until recently I didn't find anything that is more secure, as simple to use and that doesn't require a third party service that probably decrypts the session in the middle as well. After my recent exploration of ssh (see my posts on ssh login certificates and ssh SOCKS proxying) I thought of a solution with ssh to protect my VNC sessions as well.

Another shortcoming of my old VNC solution was that changing locations of me and the supported parties required reconfiguration of the DSL router at home. Sometimes I am at home behind my home NAT while the other party is behind another NAT. At other times the person to be supported is behind the home NAT and I'm on the other side of the planet. And finally, there are times when both parties are not at home and there still needs to be a way to get connected without using a third party service in the middle. In the past, I've figured out different approaches to do this, such as the VNC server establishing a connection to the client in some scenarios, the VNC client contacting the server in others and by reconfiguring the router at home. Yes, that was complicated.

The solution I have now found fixes both issues and works as follows: To be location independent there needs to be one secure anchor point that is reachable from home and also when one or both parties are not at home and behind other NATs. This secure anchor point is a Raspberry Pi in my home network to which both parties can establish an ssh tunnel through a port that is forwarded from my ADSL router to the Pi.

The side that wants to export the screen establishes the ssh tunnel with the following command that forwards the VNCs server port (TCP 5900) to which client viewers can connect over the ssh tunnel to the Raspbery Pi. On an PC running Ubuntu the commands for this look as follows (for the Windows /Putty version have a look here:

x11vnc -localhost -usepw -forever -display :0
ssh -N -R 17934:localhost:5900 -p 9212 username@domain.com

The first command launches the vnc server and the '-localhost' ensures the server port is only accessible to applications running on the PC and not to the outside world. The ssh command that follows uses the '-N' option in order not to open a remote shell window and the -R option to forward the local server port 5900 to port 17934 on the Raspberry Pi. The '-p 9212' option is used to instruct the ssh client to use tcp port 9212 to connect to the Raspbery Pi instead of the default port 22 for ssh. While this doesn't add a lot of security it at least keeps the authentication log clean as that port is not found by automated bots looking for vulnerable ssh servers on port 22. The final parameter is the username and the domain name of my home network connection and a dynamic DNS service keeps that updated with the IP address that changes once a day. One thing that comes quite handy at this point is that I use certificates for ssh authentication rather than passwords (see my post here), so no password needs to be typed in.

On the side that wants to view the screen, an ssh tunnel is established with a slightly different ssh command that pulls port 17934 from the Raspberry Pi to the same local port number. Notice the use of the '-L' option compared to the the '-R' option as this tunnel does exactly the opposite:

ssh -N -L 17934:localhost:17934 -p 9212 username@domain.com

And that's pretty much it. Once both tunnels are in place any VNC viewer such as Remmina can be used to connect to the VNC server over the two ssh tunnels. Remmina even has the capability to establish the ssh tunnel as part of a connection profile. A nice side effect is that there is no order in which the two ssh tunnels have to be established. A Raspberry Pi, forwarding a TCP port on the home router and 3 shell commands is all it takes. Quite amazing.

One shortcomming that 3 shell commands approach has is that this solution is only suitable for supporting trused relatives aand friends as the ssh tunnel also gives the supported party access to a command shell on the Raspberry Pi. This can be fixed with a little extra time and effort as described here.

(P.S. And in case you wonder about part 1 – 12 of 'Raising the Shields' have a look here)
Using a Raspi as a SSH SOCKS Proxy VPN Server With Firefox

Back in March this year I had a post in which I described a backup plan to access my cloud services at home over the cellular network in case of a DSL line failure. The core of the solution is a Raspberry Pi sitting behind a cellular router waiting for an incoming ssh connection over which I can then access my other machines. The Pi allows access to other machines on the network either from the command line, or via the Pi's graphical user interface that I can forward through the ssh tunnel using VNC.

Forwarding the GUI over the tunnel is quite useful for accessing the web based user interfaces of my DSL gateway and cellular gateway routers via a web browser running on the Pi to analyze the fault and to modify port forwarding settings. A shortcoming of this approach, however, is that the web browser is quite slow on the Pi, especially when used remotely. Also, it doesn't handle some of the web page input fields very nicely, so some configuration tasks are a bit tricky. When a colleague recently showed me a much simpler and faster solution, I immediately jumped ship:

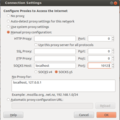
Firefox-socks-configInstead of forwarding the graphical user interface of the Pi through the ssl tunnel, the ssh client can also be used as a SOCKS proxy for Firefox (or any other browser for that matter) running on my notebook. When a web browser is used in SOCKS proxy mode, all web page requests are tunneled from the local ssh SOCKS proxy tcp port to the SOCKS proxy server running as part of the ssh daemon process.

In practice, it's surprisingly simple to set-up. On the Raspberry Pi side, no configuration whatsoever is necessary! On the client side, the command to start the ssl client as as SOCKS proxy looks as follows on the Linux command shell (on a Windows machine, Putty should do the trick):

ssh -D 10123 -p 22999 pi@my-own-domain.com

In this example, 10123 is the local port number that has to be used as the SOCKS port number in Firefox as shown in the picture on the left. The '-p 22999' is optional and is given in case the ssh server is mapped away from the standard port 22 for ssh to 10123.

In Firefox, the SOCKS proxy mode has to be configured as shown in the image. In addition 'network.proxy.socks_remote_dns' has to be set to 'true' in 'about:config' so the browser also forwards DNS requests through the SOCKS connection.

Obviously, transmitting html pages instead of screen updates over the ssh connection makes the process of interacting with the web interfaces of the remote routers a lot snappier. And by the way: The proxying is not limited to web servers in my network at home as the SOCKS server running as part of the ssh daemon on the Raspi is also happy to establish a TCP connection to any server on the Internet. Also, any other SOCKS capable program such as the Thunderbird email client can use the proxy to tunnel their traffic.

Before my colleague told me I never thought this could actually be done by ssh, as this proxying capability is not part of of the original ssh functionality. Wikipedia has a nice post on how SOCKS works: When a SOCKS capable program (e.g. Firefox) contacts the proxy for a new TCP connection for the first time from a new TCP port, it tells the local SOCKS front end which IP address and port it wants to contact. The front end then contacts the SOCKS backend over the ssh tunnel on the Raspberry Pi which in turn will create the connection to the requested IP address and TCP port. The browser then goes ahead and sends the http request over this connection. The SOCKS frontend can establish many independend TCP connections simultaneously as it can distinguish different data streams from the local TCP port the socks capable program has initially established the connection from. How nifty 🙂

SSH Client Certificates to Talk to My Raspberry PIs

I like to interact with my Raspberry PIs at home on the shell level for lots of different things and I can't count the number of times I open a remote shell window every day for various purposes. I also like to keep my virtual desktop tidy so I usually close shell windows when I'm done with a specific task. The downside is that I have to type in the server password frequently, which is a pain. So recently a colleague of mine gave me the idea to use ssh client certificates to get rid of the password promts when I open a new ssh session to a remote server. There are a few things that have to be put into place and I thought I'd put together a quick mini-howto as the information I could find on the topic was a bit more confusing than necessary.

Step 1: Create a public/private key pair on the ssh CLIENT machine

  • Check that '~/.ssh' exists
  • Generate a public/private keypair with: 'ssh-keygen -t rsa'
  • The command generates the following two files in '~/.ssh': id_rsa and id_rsa.pub

Step 2: Put the public key part of the client on the ssh SERVER machine

  • Check that in the home folder of the user you want to login as that the .ssh directory exists
  • Then do the following:

cd .ssh
nano authorized_keys

  • Add the content of the client id_rsa.pub file to the authorized_keys file on the server side

Step 3: Configure the SSH Daemon on the SERVER machine to accept client certificates

These commands make the SSH daemon accept certificates:

  cd /etc/ssh

  sudo cp sshd_config sshd_config.bak

  sudo nano sshd_config

  –> make sure the following three lines are uncommented:

  RSAAuthentication yes
  PubkeyAuthentication yes
  AuthorizedKeysFile %h/.ssh/authorized_keys

  • Restart the SSH daemon to finish the process with: 'sudo /etc/init.d/ssh restart'

Once done, ssh can be used the same way as before but there's no password prompt anymore. Great!

German EMail Providers Are Pushing Encryption

Recently I reported that my German email providers have activated perfect forward secrecy to their encryption when fetching email via POP and SMTP. Very commendable! Now they are going one step further and are warning customers by email when they use one of these protocols without activating encryption (which is the default in most email programs). In addition they give helpful advice on how to activate encryption in email programs and announce that they will no longer support unencrypted email exchange soon. This of course doesn't prevent spying in general as emails are still stored unencrypted on their servers so those with legal and less legal means can still obtain information for targeted customers. But what this measure prevents is mass surveillance of everyone and that's worth something as well!

How To Securely Administer A Remote Linux Box with SSH and Vncserver

In a previous post I told the story how I use a Raspbery Pi in my network at home to be able to get to the web interfaces of my DSL and cellular routers in case of an emergency. In the light of recent web interface breaches when they are accessible on the WAN side of the router I guess it can be seen as a reasonable precaution. Only two things are required for it, a vncserver running on the Linux box and ssh. If I had known it is so easy to set up and use I would have done similar things already years ago.

And here's how to set it up: On the Raspberry Pi I installed the 'vncserver' package. Unlike packages such as 'tighvncserver', this version of VNC creates starts its own X Server graphical user interface (GUI) that is invisible to the local user rather than exporting the screen the user can see. This is just what I need in my case because there is no local user using the Rapsi and there's no X Server started anyway. When I'm in my home network I can access the GUI over TCP port 5901 with a VNC client and I use Remmina for the purpose. Once there I can open a web browser and then access the web interfaces of my routers. Obviously that does not make a lot of sense when I'm at home as I can access the web interfaces directly rather than using the Pi.

When I am not at home things are a bit more difficult as just opening port 5901 to the outside world for unencrypted VNC traffic is out of the question. This is where SSH (secure shell) comes in. I use SSH a lot to get a secure command line interface to my Linux boxes but ssh can do a lot more than that. Ssh can also tunnel any remote TCP port to any local port. In this scenario I use it to tunnel tcp port 5901 on the Raspbery Pi to port 5901 on the 'localhost' interface of my notebook with the following command:

ssh -L 5901:localhost:5901 -p 43728 pi@MyPublicDynDnsDomain.com

The command may look a bit complicated at first but it is actually straight forward. The '-L 5901:localhost:5901' part tells SSH to connect the remote TCP port 5901 to the same port number on my notebook. The '-p 43728' tells ssh not to use the standard port but another port to avoid automated scanners knocking on my door all the time. and finally the 'pi@MyPublic…' is the username of the pi and the dynamic dns name to get to the Raspi over the DSL or cellular router via port forwarding.

Once SSH connects and I have typed in the password, the VNC viewer can then simply be directed to 'localhost:1' and the connection via the SSH tunnel to the remote 5901 port is automatically established. It's easy to set up, ultra secure and a joy to use.

Raising The Shields – Part 12: Why Do eMail Clients Not Have An Option To Show Certificate Changes?

There we go, as recently reported, my eMail hosters now use Perfect Forward Secrecy (PFS) key negotiation to thwart mass surveillance. There is one more thing I'd like to have though, not from them, but from Mozilla and others working on eMail client programs such as Thunderbird: Warnings when SSL certificates change.

While it's great to have PFS in place there is still the loophole that anyone being able to create a certificate for my eMail hoster's domain on the fly can spy on my email traffic. The only thing that can warn the user of this is if the email client presented a warning when the hoster's certificate changes. I know that's probably nothing for the masses but a little switch in the configuration for those who'd like to have it would be very nice.

On the web browser side I use the 'Certificate Patrol' plugin for the purpose and it's quite interesting to see when and how often certificates change. I'd really like to have something similar for Thunderbird as well!

P.S.: And in case you are wondering about previous 'Raising the Shields' posts, click on the privacy tag below or use this Google search.

Raising the Shields – Part 11: My Email Hoster uses Perfect Forward Secrecy Now

Email certificate infoOne of the few positive outcomes of the ongoing spying scandal is that German email hosters have announced to improve security for email exchanged between them by introducing encryption. In addition, many of them have now upgraded their security for SMTP, POP and IMAP connectivity to their customers as well. When I recently run a trace of the email traffic between me and my provider I was positively surprised to see that they now use TLS_ECDHE_RSA_WITH_AES_256_CBC_SHA (0xc014) as a cipher suite with clients that support it (e.g. Thunderbird in my case on my notebook and K9 email on Android). ECDH stands for Elliptic Curve Diffie Hellman, an algorithm that to generate temporary cipher keys which can't be reconstructed even if the SSL certificate used during session establishment falls into the wrong hands later on. Hence it's called 'Perfect Forward Secrecy'. For details of what this means, have a look at this previous post. While my data is still stored on the server as clear text this at least prevents casual eavesdropping by those analyzing all data that runs through a transmission link. And that suits me just fine!

The Three Levels of SSL Security: RC4, Better Encryption, PFS

Client-helloAnother outcome of my recent activities around SSL certificates and https encryption is that I've become aware that there are quite a number of different encryption algorithms a web server can choose from to secure a connection. These range from 'probably breakable instantly' by certain security agencies to pretty much unbreakable even if the key is compromised later on. So I've categorized the SSL encryption algorithms used today as follows:

Level 1 – breakable, should not be used anymore: This category contains encryption based on the RC4 stream cipher which is still used by quite a number of websites today including banks. This is surprising but many organizations felt that their use was a necessary evil because other algorithms were at some point prone to the so called BEAST attack.

Level 2: This category contains algorithms that do not use the RC4 stream cipher but which were unfortunately prone to the BEAST attack mentioned above. All browser manufacturers have reacted in the meantime and mitigated this sort of attack. One disadvantage of algorithms in this category is that data can be decrypted in real time or even later on if was recorded should an attacker be able to obtain of the private key.

Level 3: Perfect Forward Secrecy (PFS): Algorithms in this category use Diffie-Helman (DHE) or Elliptic Curve Diffie-Hellman key exchange (ECDHE) methods to negotiate session keys. This makes it impossible to decrypt recorded traffic should the private key be compromised in the future.

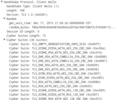
Server-heloUnfortunately web browsers do not indicate which algorithm is used to secure a https connection. Agreed, most people wouldn't know what to do with the information anyway but the same is true of the certificate details that can be viewed, e.g. in Firefox. So perhaps a feature for the future?

But while browsers are little help, Wireshark comes to the rescue. The first image on the left shows an excerpt of a 'Client Hello' message during the establishment of a HTTPS connection that gives the web server a list of all supported ciphering suites the browser supports. The list is actually quite long and cipher suites are ordered by preference. RC4 based cipher suits are pretty much at the bottom of the list and so far down they didn't even make it into the screenshot. The web server then selects one of the cipher suits and informs the web browser with a 'Sever Hello' message which one it has selected. This is shown in the second picture on the left. In this case an Elliptic Curve Diffie-Hellman cipher suite with perfect forward secrecy was selected. Excellent!

For further information I can recommend the SSL-Labs website. It offers an interesting SSL test for web sites and shows which ciphering suites are used when used with different browsers and gives lots of interesting background information (such as why RC4 should not be used anymore and why PFS is the way to go).

How To Get An SSL Certificate For Your OwnCloud At Home That Runs On A Dynamic IP Address

I've been running an Owncloud instance at home for a while now and it's been revolutionary for me. It allows me to securely share my calendar and address book between several of my devices over the Internet and it lets me share files with friends and associates as easily as over less secure commercial cloud services. The only shortcoming I grew a bit tired of was that I only had a self-signed SSL certificate for my web server. This means that I either had to send http download links to those I wanted to exchange a file with or to tell them to ignore the stern warning message about a non-authenticated certificate when sending them an https link. Both options are not really acceptable in the long run, at least not to me.

The solution, of course is to get my SSL certificate for my Owncloud web server authenticated by a Certificate Authority. This is a bit tricky, though, as I run my Owncloud at home and my DSL line has a dynamic IP address that changes once a day. Therefore I use a dynamic DNS provider and whenever my IP address at home changes, my DSL router at home contacts the dynamic DNS provider and updates the IP address for my domain name. The catch with this approach is that in order to get an SSL certificate one has to be the owner of the domain name. When using a free dynamic DNS service, the servie provider owns the domain name and distributes sub-domains to users. In other words it's not possible with this setup to get an SSL certificate authenticated by a Certificate Authority for a sub-domain of the dynamic DNS provider.

Some dynamic DNS providers offer to register domain names in the name of the customer that can then be used with their dynamic DNS services but this is obviously not free. I didn't shop around for a cheap solution as I am very happy with the reliability of No-IP whom I've used for a long time now with a free account. It works well so I decided to stay. No-IP offers two variants of using one's own domain name with their dynamic service and this is actually a bit confusing: Their "Plus-DNS" package lets you use a domain name that is already registered to your name. This requires that the company that has registered a domain name for you has to allow you to change the DNS entry to point to No-IP. I have a couple of domains I could use for this purpose but unfortunately my provider does not let me change the DNS entries.

Therefore what I really needed was to get a domain name via No-IP and then link that with their "Plus-DNS" package. Note: Whether No-IP is a suitable dynamic DNS provider for you or not depends on whether your DSL or cable router at home lets you configure them for dynamic DNS services so have a look there first. Unfortunately, No-IP doesn't do a very good job of pointing out that the two packages need to be combined so I got it wrong the first time. So here's how it works if it is done in the correct order: Getting a domain name via them costs $15 a year when you start from this link.  But that's only half the deal as later on you also have to select the "Plus-DNS" package to add the dynamic DNS functionality to the domain name. The package altogether is $32 or around €25 per year. The domain name is registered in an instant and usable straight away. Care should be taken that the email address registered for the domain name is real as later on an email is sent to this address during the SSL certificate authentication process.

Once the domain works and points to the IP address dynamically assigned to the home network, everything is in place to create the SSL certificate and get it authenticated. No-IP also offers to do that part but I found the price a bit too high. So I looked around a bit and found Namecheap that resells Comodo SSL certificates for $9 with a validity period of one year. I tried their certificate later on with Firefox, Internet Explorer on the desktop as well as Safari and Opera on mobile and its accepted by all of them. Creating a certificate and then getting it authenticated is quite straight forward once one knows how to do it and I've described the details in this blog post.

Once the Certificate Authority delivers the signed SSL certificate by email the final step is to configure the web server to use it. In my case I use Apache2 for my Owncloud instance and as I have no virtual hosts configured the only configuration file that needs to be changed is /etc/apache2/sites-enabled/default-ssl. Here's the lines that need to be adapted:

#   SSL Engine Switch:
#   Enable/Disable SSL for this virtual host.
SSLEngine on

#   A self-signed (snakeoil) certificate can be created by installing
#   the ssl-cert package. See
#   /usr/share/doc/apache2.2-common/README.Debian.gz for more info.
#   If both key and certificate are stored in the same file, only the
#   SSLCertificateFile directive is needed.

SSLCertificateFile    /etc/ssl/certs/martin.crt
SSLCertificateKeyFile /etc/ssl/private/martin-server.key

#   Server Certificate Chain:
#   Point SSLCertificateChainFile at a file containing the
#   concatenation of PEM encoded CA certificates which form the
#   certificate chain for the server certificate. Alternatively
#   the referenced file can be the same as SSLCertificateFile
#   when the CA certificates are directly appended to the server
#   certificate for convinience.

SSLCertificateChainFile /etc/ssl/certs/martin.ca-bundle

If you've read my post about SSL certificates linked above, the lines that use the .crt and the .key file are easy to understand. I'm not sure if the third parameter, SSLCertificateChainFile, needs to be configured as well as it is only used during client authentication which is only done for special applications and Owncloud is not among them. I configured it to one of the ca-bundle files I received from the Certificate Authority.  That was probably not quite correct as the ca-bundle files should perhaps have been linked together before doing so but as it is not used anyway I don't think it hurts. The third parameter points to the file that contains the certificate chain of the certificate issuer. Like the signed certificate file it is also provided by the certificate authority.

There we go, that's it, for less than €35 a year I have my own domain now for my Owncloud instance at home together with a valid SSL certificate!

Does a Certificate Authority See Your Private Key?

One of the questions I had for a long time now is if a Certificate Authority sees the private key of an SSL certificate for a web server during the certification process? If so, it would be quite a security issue.

Before answering the question, it's probably a good idea to quickly have a look at what an SSL certificate and a certificate authority is and what they are needed for:

The first purpose of an SSL certificate is for it to be sent from a web server to a web browser whenever the https (http secure) protocol is used to establish an encrypted connection. The SSL certificate contains the public key of the web server that is used to generate a session encryption key. The basic idea behind this approach is that anything that is encrypted with the public key can only be decrypted again with a private key that only the web server knows, i.e. it is never transmitted to the web browser. In other words an attacker that eavesdrops on the communication can't use the private key to decrypt the packets he sees passing through.

The second purpose of an SSL certificate is to contain information for the web browser so that he can validate that the connection is really established to the web site the user wants to visit and is not to a malicious other site to which he was redirected by a potential attacker. To achieve this, an SSL certificate has to be signed by a Certificate Authority that vouches for the validity of the certificate. Signing a certificate is done once and requires that the person or company requesting validation from a Certificate Authority can prove that it is the owner of the domain name in the certificate. This are several ways to do this and I'll describe that in a separate blog post. Once the Certificate Authority has established that the person or company requesting the certificate is the rightful owner of the domain name it generates a public certificate from the information supplied by the requester in a certificate signing request (CSR) which contains, among other things, the domain name (e.g. www.wirelessmoves.com) and the public key to be used.

The important point is that the Certificate Authority does not generate any keys, it just uses the information supplied by the person or company contained in the certificate signing request, signs that with its own key and returns the result. And here's the crucial point: Does the information that is sent to the Certificate Authority also contain the private key that is later on used on the web server side? Would that be the case then the certificate authority would have information that, when obtained legally or illegally, would allow decrypting intercepted data packets.

To answer this question I recently tried it out myself when I needed to get an SSL certificate for my home cloud. And here's how that works: On my server at home I generate a certificate signing request with the following Unix command:

openssl req -new -newkey rsa:2048 -nodes -keyout m-server.key -out server.csr

Before the command generates an output it requests additional information from the user such as the domain name (e.g. www.wirelessmoves.com), company name, location and so on. Once this information is given, the command generates two files : The .csr file which is the signing request and the .key file which is the private key. The next step is to select a certificate authority, which I will again describe in a separate post, and then copy/paste the content of the .csr file into a text box on the web page during the validation process. The public key in the .key file, however, NEVER leaves the server.

And just to make really sure that the private key is not part of the .csr file sent to the Certificate Authority, one can decode the contents of the signing request as follows:

openssl req -in m-server.csr -noout -text

This results in the following output:

Certificate Request:
    Data:
        Version: 0 (0x0)
        Subject: C=DE, ST=Ger, L=Cologne, O=wlx, CN=www.m-test.com
        Subject Public Key Info:
            Public Key Algorithm: rsaEncryption
                Public-Key: (2048 bit)
                Modulus:
                    00:a5:5b:b8:8c:11:2e:cc:48:f9:a6:4c:ed:e6:52:
                    08:58:77:3c:44:a4:78:9f:7c:51:75:79:07:f4:7b:
                    […]
                    0a:4b:1f:bf:b9:90:7d:f8:72:01:50:bc:62:47:8d:
                    be:2e:9e:71:e9:0c:80:56:77:7d:27:05:1b:da:3d:
                    87:d9
                Exponent: 65537 (0x10001)
        Attributes:
            a0:00
    Signature Algorithm: sha1WithRSAEncryption
         73:7c:76:fa:74:b2:34:be:c1:36:9b:aa:06:51:25:e9:f9:df:
         43:0c:9a:a9:75:28:8e:5f:41:f0:30:da:7b:aa:29:90:ea:39:
         […]
         3e:63:d9:1c:e7:65:24:32:c6:05:da:47:10:fd:e9:00:29:ed:
         76:54:54:27:c6:ff:f4:e3:c5:e8:74:1c:dd:29:d0:18:b2:09:
         bd:4c:23:86

There we go, so here's the proof that the Certificate Authority never sees the private key and hence your communication is save from eavesdropping except from those that can steal the Certificate Authority's signature key or can set up a Certificate Authority trusted by web browsers (which I am sure quite a number of three letter agencies have already done) and stage a man in the middle attack. There are ways to protect yourself against that as well, e.g. by using the Certificate Patrol Firefox plugin. But that's another story I've already blogged about here.