The Mysterious IPv6 DNS AAAA-Resolver Bug

In my quest to do as many things over IPv6 now that it’s supported not only by my VDSL line at home but also by my mobile network operator, the last success story I reported here was about how to update my IPv6 DNS entry whenever the dynamic IPv6 address of one of my servers at home changed. The procedure works like a charm but unfortunately I found a big bug in the DNS resolver in my Fritzbox VDSL router that pretty much forestalls my IPv6 home server ambitions for the moment.

Continue reading The Mysterious IPv6 DNS AAAA-Resolver Bug

No Love In Ubuntu 14.04 for OpenVPN and IPv6/UDP for Transport

On my way into IPv6 land the next stop was in OpenVPN land and to see if I could establish an OpenVPN tunnel over an IPv6 UDP connection. Note that in this scenario I only want to have IPv4 inside the tunnel as before but the tunnel itself should make use of a UDPv6 instead of a UDPv4 connection. Turns out that OpenVPN does support this in principle but one has to decide whether to start the OpenVPN server in IPv4 or IPv6 mode. Dual-stack operation is not yet included. Not ideal, but for testing purposes I would have switched to IPv6 on the server side. Unfortunately it never came to that because the OpenVPN client in Ubuntu’s network manager does not have an option in the GUI and also not in the NetworkManager configuration files to specify UDPv6 as a transport protocol. Quite a pity as it excludes everyone with a Dual-Stack Lite cable modem from installing an OpenVPN server at home and using it together with Ubuntu’s NetworkManager. Perhaps the OpenVPN client can be launched from a shell but where’s the fun in that?

How To Get That Dynamic IPv6 Address To The DNS Server

In a previous post on my first “IPv6 call” to a service at home I reported about the pains of finding a Dynamic DNS provider that supports IPv6 and supports it with a Time To Live (TTL) value of 60 seconds. The later part is important as this is the time the domain is not reachable in the worst case when the IPv6 address changes. For the moment my solution is to use a CNAME entry in my domain name I host at noip.com to another domain name at dynv6.com. For details see the previous post. The next challenge now was to find out how to automatically update the IPv6 address at the DNS server once it changes as this does not work the same way as for IPv4 addresses.

Updating the dynamic IPv4 address at a DNS server is straight forward. Either the Network Address Translation (NAT) router already has the functionality to send an update message to the dynamic DNS server or a simple http(s) request from any machine behind the NAT with some authentication information in the URL does the trick. No IP address is required in the request as the DNS server gets the request from the backhaul facing public IP address and just takes the value from layer 3. With IPv6 this doesn’t work for two reasons:

There is no NAT anymore so each server behind the router has its own public IPv6 address and thus has to send the request by itself. O.k., so far, no big deal. The next problem is that the server can have more than one public IPv6 address. While the public prefix for these IPv6 addresses are the same, there can be different interface IDs in case IPv6 privacy extensions are enabled. On a server, privacy extensions are not necessary but Ubuntu server seems to have it switched on by default. Also, for a little while there can be deprecated IPv6 addresses in the address list with a prefix that is no longer valid. To get the IPv6 address across to the dynamic DNS server one could do as before and just send an http(s) request with a token if the URL is only reachable via IPv6. The problem with this approach is that the update domains for the service I tried to not support that, they are both IPv4 and IPv6 reachable.

Another problem occurs in case privacy extensions are used on the server as described before. In this case the interface ID will be randomly assigned for one of the IPv6 addresses bound to the interface. While the dynamic DNS server won’t mind, the router at home will because, at least my model blocks incoming IPv6 requests to all interface IDs by default and exceptions have to be statically configured. That’s a good thing but this requires that the interface ID of the server remains static. One of the two IPv6 addresses on my server fulfills this requirement as the interface ID is based on the Ethernet adapter’s MAC address so I can use this interface ID to configure the IPv6 firewall in the router. However, the request to the dynamic DNS server to update the IPv6 address does not originate from this IPv6 address but from the one with the randomly assigned interface id. Twice out of luck.

The solution to the problem is to find out which global dynamic IPv6 addresses are currently auto-configured on the server and to select the IPv6 address form the list that uses the MAC address as interface ID in the IPv6 address. The easiest way to do this I have found so far is a great shell script dynv6.com offers for the purpose that can be found here. For my purposes I’ve made two changes:

First, I adapted the command that finds the current IPv6 address. The original script does not take IPv6 privacy extensions into account which can be fixed by modifying the line as follows:

address=$(ip -6 addr list scope global $device | grep -v ” fd” | grep “global dynamic” | sed -n ‘s/.*inet6 ([0-9a-f:]+).*/1/p’ | head -n 1)

And the second change I’ve done in the script is to use https instead of http to actually run the queries as dynv6 supports https for the updates as well. No need to spread the word about my id token in plain http requests. The beauty of the script is that it checks if the IPv6 address has changed and only sends an update if it has. This way I can call the script with a cron job once a minute without sending and update to dynv6.com every time.

There we go, this problem is now solved as well!


Uberspace, IPv6, Let’s Encrypt, Domain Names, etc. etc.

Over the weekend I wanted to set up a cloud based project management software and after my default web hoster failed miserably, I took the opportunity to try a new hosting company I heard of some time ago called Uberspace. This post is probably only interesting for German speakers because they only have a German web presence, sorry about that. So you might wonder why I am reviewing a web hoster, that's quite out of the ordinary for this blog!? Right, but this web hoster is too!

Unlike other hosting services that I've been using for over a decade that have become big behemoths that are now only interested in the masses and offer a very limited feature set and not a tiny bit more, Uberspace offers a lot of features, an online documentation that is very nerdy and fun to read and they offer maximum freedom for my web hosting requirements. For starters, they don't want money up front, you can try for free for a month. If you walk away during that time the account is simply deleted, no questions asked. If you want to stay around you decide how much you want to pay per month. They give some guidance of what they think this should be (€5) and give a detailed overview of their own costs from power consumption to hardware purchases. I like transparency and details! They also point out that in case you are cash starved you can also pay less. Paying more is also possible of course. A wonderful approach that seems to work, they've been around for a while.

Apart from the easy signup process all the rest is pretty much straight forward as well. After FTPing the project manangement software to my virtual web server and creating a mySQL database via mySQLAdmin web frontend I could immediately start working with it and could access it over both HTTP and HTTPS with the default domain name given to my account. Adding my own domains for the web space is simple as well, a simple command in the shell and it is done. Afterward, the IPv4 and (optionally) the IPv6 address of the site needs to be provisioned in the DNS server which by the way they don't provide so you can and have to bring your own domain names. It worked like a charm both for IPv4 and IPv6. Wonderful!

To use HTTPS with my own domain name an SSL certificate is required. Uberspace offers two ways of doing this. The old fashioned way is to get an SSL certificate somewhere and then to import the certificate and key files to the web space. The cool way to do it since last December is to use Let's Encrypt and Uberspace is probably one of the first web hosters that has integrated Let's Encrypt. It took about two minutes and three commands on the shell to request the generation and installation of the certificate. It was so simple I couldn't believe it until I checked that the Let's Encrypt certificate is actually used when I browsed to my site. Awesome!

Freedom, IPv6, Let's Encrypt, a great nerdy online documentation and my website was up and running with my own domain and https in less than an hour, Uberspace certainly got me hooked!

My First IPv6 “First Call” To My Own Services At Home

A date to remember for me: On 15th January 2016 I contacted my web server at home running Owncloud and Selfoss for the first time over IPv6. From an end user's point of view no difference is visible at all but from a technical point of view it's a great "first time" for me, made even sweeter by the fact that my PC was not connected to another IPv6-enabled fixed line but connected via tethering to a smartphone with dual-stack IPv4v6 cellular connectivity.

The Thing With Dynamic IPv6 Addresses for Servers

And it's been a bit of a struggle to put together, this IPv6 stuff is not as straight forward as I hoped it would be. For a crash course I wrote back in 2009 have a look, here, here, here and here. The major challenge that I had to overcome for this to happen is to find a dynamic DNS service that can handle not only dynamic IPv4 addresses but also dynamic IPv6. Noip.com, where I host my domain and where I use the dynamic DNS service can handle IPv6 addresses for my domain but only static entries. The response to a support question how to do dynamic IPv6 addresses with them resulted in the little informative answer that they are working on it but no date has been announced by when this will be available. Hm, looking at their record, they seem to be working on IPv6 already since 2011 so I won't get my hopes up that this will happen soon. Is it really that difficult? Shame on you!

O.k., another dynamic DNS service I use is afraid.org and they do offer dynamic DNS with IPv6. Unfortunately, they have a DNS entry time to live (TTL) for IPv6 of 3600 seconds, i.e. 1 hour. This is much too long for my purposes as my IPv6 prefix changes once a day and any change must be propagated as quickly as possible and not only after an hour in the worst case. They offer a lower TTL with a paid account, but their idea and my idea of how much this may cost are too far apart. I've found a couple of other dynamic IPv6 services but they were also not suitable for me because they also had TTLs that were too long for my purpose.

One option I found that didn't have this restriction is dynv6.com. Their service is free and they do offer IPv4 and IPv6 dynamic DNS with a TTL of 1 minute but only for their own domain. Not an option for me either, I want to be reachable via my own domain. Kind of a deadlock situation…

But here's how I finally go it to work: The Domain Name System has a forwarding mechanism, the "Canonical Name Record" (CNAME). By using this mechanism, I can forward DNS queries for my domain that is hosted at noip.com (let's say it's called www.martin.com) to my subdomain at dynv6.com (let's say my domain there is called martin.dynv6.com). So instead of updating the DNS entry for www.martin.com when my IPv6 address changes once a day I can now update martin.dynv6.com which has a TTL of 1 minute while the CNAME forwarding at noip.com from www.martin.com to martin.dynv6.com in the DNS system is static and remains unchanged.

As a result the web page name in the browser remains "www.martin.com" but I can use my dynamic IPv6 record at dynv6.com where customer specific domains are not offered. Not ideal but it will do until NO-IP.com gets their act together.

IPv6 At Home And Away Now

In the second half of last year, my mobile network operator of choice has introduced IPv4/v6 dual-stack functionality and since then I've been enjoying IPv6 on my mobile device while away from home. Not that I would notice as a normal user as all services I use can still be reached over IPv4, but as a tech-geek, you know… For me this was a bit ironic as I always assumed that I would have IPv6 on my DSL connection long before I use it on my mobile devices in the cellular network. And I could have, to be honest, but I just didn't want to update my fixed line connection at home to "all-IP" as it's a critical link and I don't change critical infrastructure just like that if not really necessary. Anyway, back in December 2015 I had to switch my DSL line to "all-IP" because my network operator politely forced me to and apart from a number of other sweet things the new package included native IPv6 connectivity if I wanted to.

As I was traveling a lot in December I decided to keep IPv6 off for the time being and start experimenting with it once back home for more than just a couple of hours. So this week I finally go around to switching IPv6 on and just let it ran for a while without any other modifications to make sure my servers are not negatively impacted. So far, things have run smoothly except for one thing I was expecting. After switching on IPv6, my devices immediately found the public IPv6 prefix and assigned public IPv6 addresses to themselves. The servers did so as well, including my Raspberry Pis, a nice side effect of having upgraded them from Raspbian based on Debian Wheezy to Raspbian based on Debian Jessie last year. That will make things a bit easier to make them reachable not only via IPv4 but also via IPv6 from the Internet later. The one thing I was actually expecting to break is that for some services I use VPN connections to overcome geo-blocking. As my external VPN service provider does not support IPv6 but happily returns IPv6 addresses to DNS queries I had to disable IPv6 on that machine.

Speaking of inbound IPv6 to my servers that's going to be an interesting thing to get working. So far I see two issues that have to be addressed:

  • Today I run several servers behind the same IPv4 address and domain name. With IPv6 they will have different IP addresses so using the same domain name is going to be a challenge.
  • My Dynamic-DNS provider does support IPv6 AAAA records but not updating IPv6 records dynamically other than over the web interface. Quite a shame in 2016…

Two fun things to figure out in 2016…

How To Pretect Against IPv6 Leakage in an IPv4 VPN Environment – Part 3 (Raspi VPN Gateway)

In the previous two parts on IPv6 leakage in IPv4-only VPN environments I’ve taken a look at how things can be fixed on the client side (part 1) and on the network side (part 2). While being at conferences and in hotels I often use a Raspberry Pi Wi-Fi VPN client gateway to connect all my Wi-Fi devices to the local network with a single sign-in. Once connected the Raspberry Pi then establishes a secure VPN connection that is then used by all my devices. In other words, the VPN tunnel is not established from my PC but from the gateway. The big question is, does IPv6 leakage occur here as well?

A gave it a quick try and everything is o.k. Per default, Raspian does not activate IPv6 at all. When activated manually (sudo modprobe ipv6) the Raspi will request an IPv6 address on the backhaul interface. If it gets one it doesn’t share it with the local Wi-Fi link to which all my devices are connected. In other words, no bridge is created, no IPv6 leakage can occur and any traffic to and from all local Wi-Fi devices pass through the VPN tunnel.

Good, one thing less to deal with…

How To Pretect Against IPv6 Leakage in an IPv4 VPN Environment – Part 2 (Server Side Changes)

While being excited about the availability of IPv6 from my mobile network operator of choice the disadvantage that comes along with it is IPv6 leakage when using Witopia’s VPN service with OpenVPN on Ubuntu. For some strange reason they answer IPv6 DNS AAAA requests even though their product only tunnels IPv4 packets. My OpenVPN server setup at home on a Raspberry Pi had the same behavior so far but as it is under my own control I started looking for ways to change that.

At first it looked as if it would be a straight forward thing to implement. But the first look was a bit deceiving and in the end it took a bit of more tinkering before the DNS server queried through the VPN tunnel only returned DNS responses for IPv4 A-requests and empty results for IPv6 AAAA-requests.

The OpenVPN Server setup I have linked to above relies on a DNS server already present in the server’s network to also answer queries from remote OpenVPN clients. As there was no way for me to change that DNS server’s behavior I had to setup a separate DNS server on the OpenVPN Server Raspi and then reconfigure OpenVPN to point clients to that DNS server.

Bind Comes To The Rescue

On Linux, “bind” is one of the most popular DNS server. While it is probably overkill to use “bind” just as a DNS request forwarder it does offer a nice option to return an empty result for IPv6 AAAA-requests when sent over IPv4. Here’s some more background information on the option. For this option to work, bind needs to be compiled with a special flag to recognize the “filter-aaaa-on-v4 yes;” configuration option. Unfortunately, bind on Raspian does not come configured with it so I had to compile bind from scratch. That sounds more difficult than it is, however.

But perhaps your distribution set the correct flag before bind was compiled so my advice is to install bind from the repositories first and see if it works with the “filter-aaaa-on-v4” option. If it doesn’t it can be uninstalled before downloading and compiling bind from it’s source. Also, it has the benefit that all configuration files are already in place which are perhaps not put into the right directories when compiling from source.

Installing Bind From The Repositories

Installing bind from the repositories works with a simple “sudo apt-get upate && sudo apt-get install bind9” command. Afterward, uncomment and modify the following section in “/etc/bind/named.conf.options” to enable DNS query forwarding to the upstream DNS server used in the network:

    forwarders {
         8.8.8.8;
    };

Once done, restart bind to see if the configuration change has been accepted: “sudo service bind9 restart“. If no error messages are shown on the console, bind is up and running.

Check If the IPv6 Option Works

In the next step add the IPvt6 filter option to the same configuration file and also allow queries from other networks by inserting the two additional lines marked in orange below. This is necessary as the OpenVPN clients get IPv4 address from a subnet that is different from the subnet that the OpenVPN Server uses on the backhaul link:

options {
    directory “/var/cache/bind”;

    //…

    forwarders {
         8.8.8.8;
    };

    //…

    dnssec-validation auto;

    auth-nxdomain no;    # conform to RFC1035
    listen-on-v6 { any; };

    filter-aaaa-on-v4 yes;
    allow-query {any;};
};

Once done, do another restart of bind. If an error message is shown that the filter option is not supported some extra work is required. Otherwise, you are almost good to go and the only thing that is required for OpenVPN clients to query this DNS server instead of the previous one is to change the DNS option in the OpenVPN config file as shown at the end of this post.

Compile and Install Bind From Source

Before proceeding, uninstall bind again with “apt-get remove bind9“. While this removes the binaries, it leaves the configuration files including the one we have modified in place. Now download and install bind with the following commands as described here. As there might be a more up to date version of bind at the time you read this it might be worthwhile to modify the version number in the commands accordingly.

apt-get install build-essential openssl libssl-dev libdb5.1-dev
mkdir bind-install
cd bind-install
wget ftp://ftp.isc.org/isc/bind9/9.9.7/bind-9.9.7.tar.gz
tar zxvf bind-9.9.7.tar.gz

fakeroot ./configure –prefix=/usr –mandir=/usr/share/man –infodir=/usr/share/info –sysconfdir=/etc/bind –localstatedir=/var –enable-threads –enable-largefile –with-libtool –enable-shared –enable-static –with-openssl=/usr  –with-gnu-ld –with-dlz-postgres=no –with-dlz-mysql=no –with-dlz-bdb=yes –with-dlz-filesystem=yes  –with-dlz-stub=yes  CFLAGS=-fno-strict-aliasing –enable-rrl –enable-newstats –enable-filter-aaaa

make install

Some patience is required as the process takes around 45 minutes. But once done everything is ready and an “/etc/init.d bind9 start” will start the service, this time with the ipv6 filter in place as the configuration file we modified further above is still in place.

OpenVPN modification

The last step now is to tell the OpenVPN server to point new clients to this DNS server. This is done by modifying the push “dhcp-option DNS x.x.x.x” option in “/etc/openvpn/server.conf” file, with x.x.x.x being the IP address of the Raspberry Pi. A “sudo service openvpn restart” activates the change.

Verifying That Everything Works

The next time an OpenVPN client device connects to the server, all DNS requests for AAAA records are getting an empty response. This can be verified e.g. by typing in “dig youtube.com AAAA” which should return an empty result and not an IPv6 address. Another option is using Wireshark for the purpose.

And that solves my OpenVPN IPv6 leakage issue without any modification on the client side!
How To Protect Against IPv6 Leakage in an IPv4 VPN Environment – Part 1

Last year I had a post that one has to be careful about establishing an IPv4-only VPN tunnel over a network interface that has a public IPv4 and a public IPv6 addresses assigned to it. If the DNS server on the other side of the VPN tunnel returns IPv6 addresses and the network stack on the client side prefers IPv6, which is usually the case, then the connection establishment will not go through the VPN tunnel but right around it via the physical network interface.

Quickly said at the time and quickly forgotten again as well as IPv6 connectivity is still rare these days. But those days are over as my mobile network operator of choice now supports IPv4v6 connectivity. When tethering my notebook via my smartphone now it configures itself for IPv4 and IPv6. That also means that I immediately get unwanted IPv6 leakage while using my VPN.

Some Mac and PC VPN client software used by some VPN providers seem to have built-in protection against it. On my Ubuntu systems, however, the OpenVPN client unfortunately does not. The only way to fix this on the client side is to disable IPv6 permanently or temporarily.

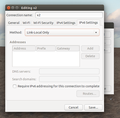
Ipv6-local-configAs I’d like to use IPv6 in general, I don’t want to disable it permanently. A temporary alternative for Ethernet and Wi-Fi connections is to to restrict IPv6 to link-local use as shown in the screenshot on the left. The problem is, however, that a new Wi-Fi connection that one creates e.g. at a hotel or exhibition venue will have full IPv6 enabled again and it’s more than likely that one forgets to turn it off manually after initial connection establishment.

But why do DNS servers on the other side of an IPv4-only VPN actually have to return IPv6 addresses? I use Witopia for some scenarios and their DNS servers happily return IPv6 addresses. I wish they wouldn’t and it makes me wonder why they are doing it when their VPN service is limited to IPv4 anyway!?

Fortunately, I use my private VPN servers for most of my VPN needs. They also return IPv6 addresses but here I can change the behavior of the DNS servers behind the VPN server to only return IPv4 DNS results. As configuring that was a bit tricky I’ll make a separate blog post out of that. So stay tuned if you are interested!